
This article highlights some of the new features in the latest releases of Spring Framework 6.1 and Spring Boot 3.2. The new release includes support for Java 21, so if you want to leverage all the new features in the JDK, you should consider upgrading. For a comprehensive overview of the changes, new features, and deprecations, I recommend referring to the release notes. In this release, I will focus on three main areas:
- Runtime Efficiency
- Virtual Threads
- Project CRaC (Coordinated Restore at Checkpoint)
- Project Leydon
- New Client Abstractions
- JDBC Client
- REST Client
- Observability Improvements
Runtime Efficiency
I have had the opportunity to travel to conferences and meet with customers, discussing the impressive features of Spring Boot 3 and beyond. One of the prominent themes in Spring Boot 3 is Runtime Efficiency. But what does that really mean, and which features are contributing to it?
Runtime efficiency is focused on addressing the challenges that arise when dealing with various workloads in production. Traditionally, a typical Java-based application would be a long-running process designed to handle high throughput. In this scenario, the JVM excels at optimizing for such workloads. It identifies "hot spots" or frequently executed areas of the code and compiles them for further optimizations.
Today, we are developing a wide range of applications with diverse requirements. Some of these applications demand lower memory usage and faster startup times. For others, which involve blocking requests like communication with a database or an HTTP service, scalability is essential.
Java and Spring now provide solutions for building various types of applications. In Spring Boot 3.0, we introduced Ahead-of-Time (AoT) compilation as a prerequisite for creating native images with GraalVM. In Spring Boot 3.2, we are introducing support for Virtual Threads and Project CRaC (Coordinated Restore at Checkpoint).
Virtual Threads
Java 21 might be one of the most significant releases we have seen in Java, ever. I don’t say that lightly because I know there have been some amazing releases over the years. This release however was the start of the Project Loom story with Virtual Threads being finalized and bringing us a solution to the scalability issues the thread-per-request model introduces.
Threads in Java
In Java, each statement inside a method executes in a thread. Java is Multi-threaded which means more than one thread can be executing a given set of instructions at once. Threads are fundamental to concurrent programming and allow a Java program to perform multiple tasks or operations concurrently, making efficient use of available resources, such as CPU cores.
In Java, a thread (java.lang.Thread) serves as a thin wrapper around the operating system thread, commonly known as Platform Threads. The operating system thread is a limited resource that relies on system resources. One major drawback of Platform Threads, in addition to their ubiquity, is their high resource consumption in terms of memory and processing time.
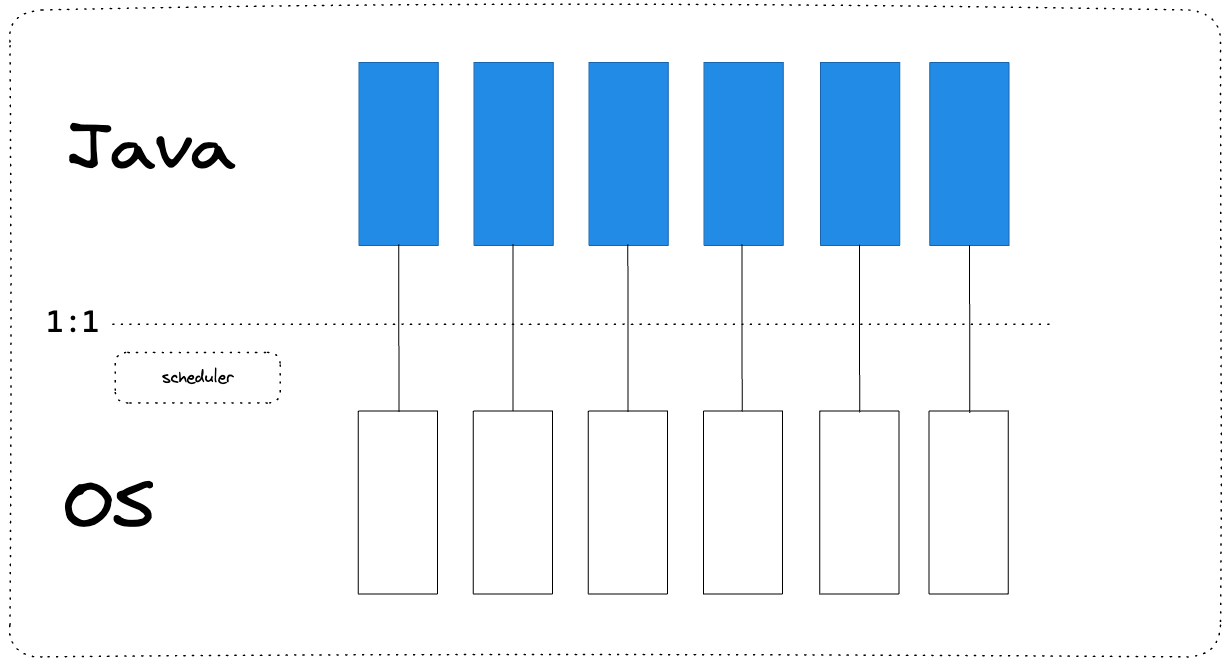
Now imagine you need to perform a blocking operation such as talking to a database or communicating with a service over HTTP. These operations are consider blocking because the thread responsible for handling this operation needs to wait for the operation to complete.
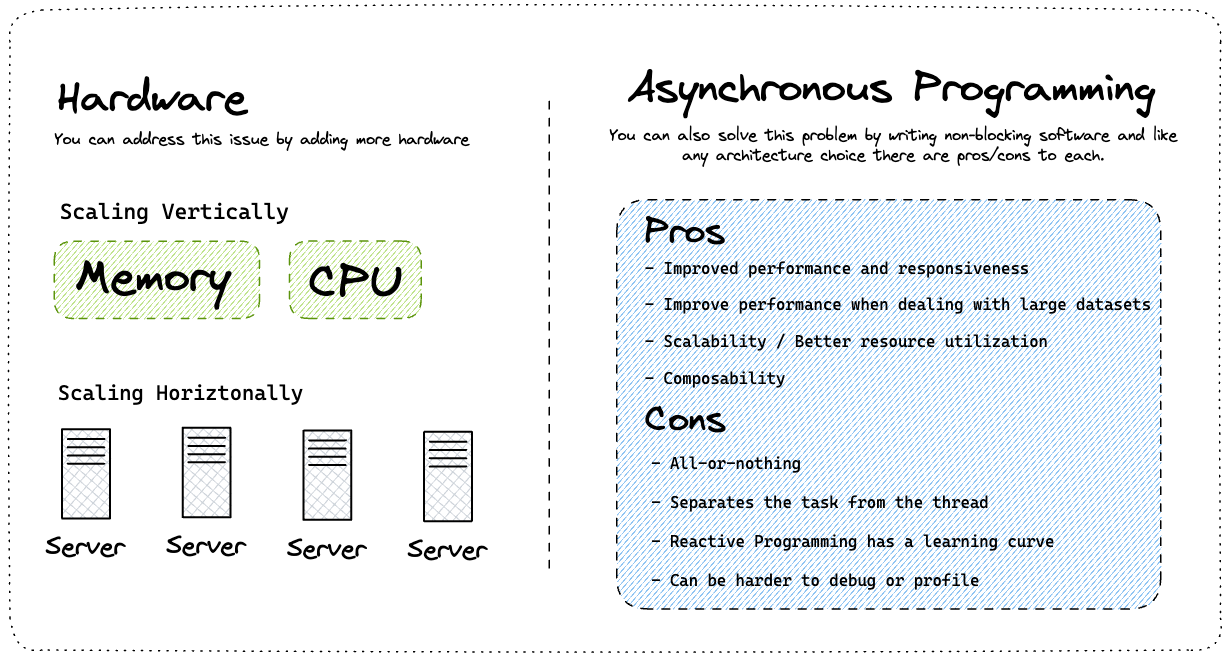
Before the introduction of virtual threads, there were two options available for addressing scalability issues in concurrent programming in Java. One option was to add more hardware by scaling horizontally or vertically. Another option was to use asynchronous programming, which, like any architectural choice, has its own advantages and disadvantages.
Why Virtual Threads in Java?
Virtual Threads were introduced in JDK 21 as a solution to the challenges of asynchronous programming. These lightweight threads do not block platform threads, making them highly efficient. In fact, you can spawn millions of Virtual Threads without needing to worry about thread pooling. This allows us to write imperative blocking code without significant concerns about scalability.
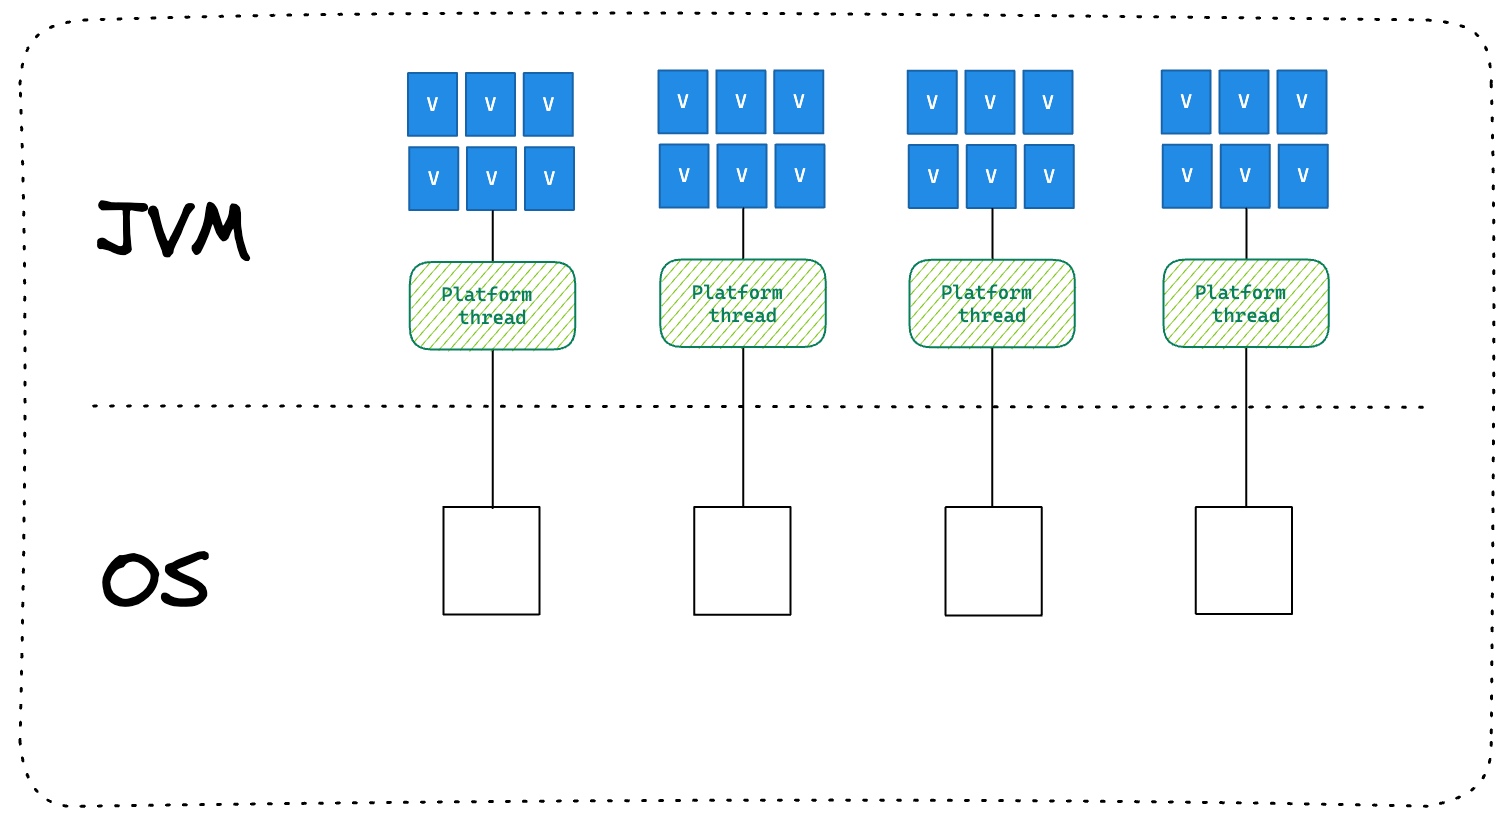
Of course there are still Platform Threads which are a finite resource so how does this work under the hood? When a virtual thread is attached to a platform and needs to perform a blocking task it is unmounted from the platform thread and moved to the heap. When the blocking operation has completed it is taken from the heap and moved to a waiting list for the platform thread it was initially mounted on.
This is really just a high level introduction to Virtual Threads in JDK 21. If you want to understand the goals, non-goals, motivation and more about them I would encourage you to take some time to read through the JEP (JDK Enhancement Proposal).
Virtual Threads in Spring Boot Example
If you're interested in learning more about Virtual Threads in Spring Boot, you can check out this article, which continues the conversation. In this example, you can create a new Spring Boot application, enable virtual threads, and run benchmark tests against it.
What is Project CRaC (Coordinated Restore at Checkpoint)
In the realm of runtime efficiency, Spring Boot 3.2 introduces an exciting JDK project called Coordinated Restore at Checkpoint (CRaC). With CRaC, projects on Linux can experience faster time to first transaction and achieve optimal code speed with reduced time and resource consumption. By capturing a snapshot of the fully warmed up Java process, CRaC enables the launch of multiple JVMs from this state. It's important to note that not all existing Java programs can seamlessly utilize CRaC, as explicit checkpointing and restoration of resources using the CRaC API are required. However, frameworks like Spring offer native support for CRaC checkpointing right out of the box.
Why Restore from a Checkpoint?
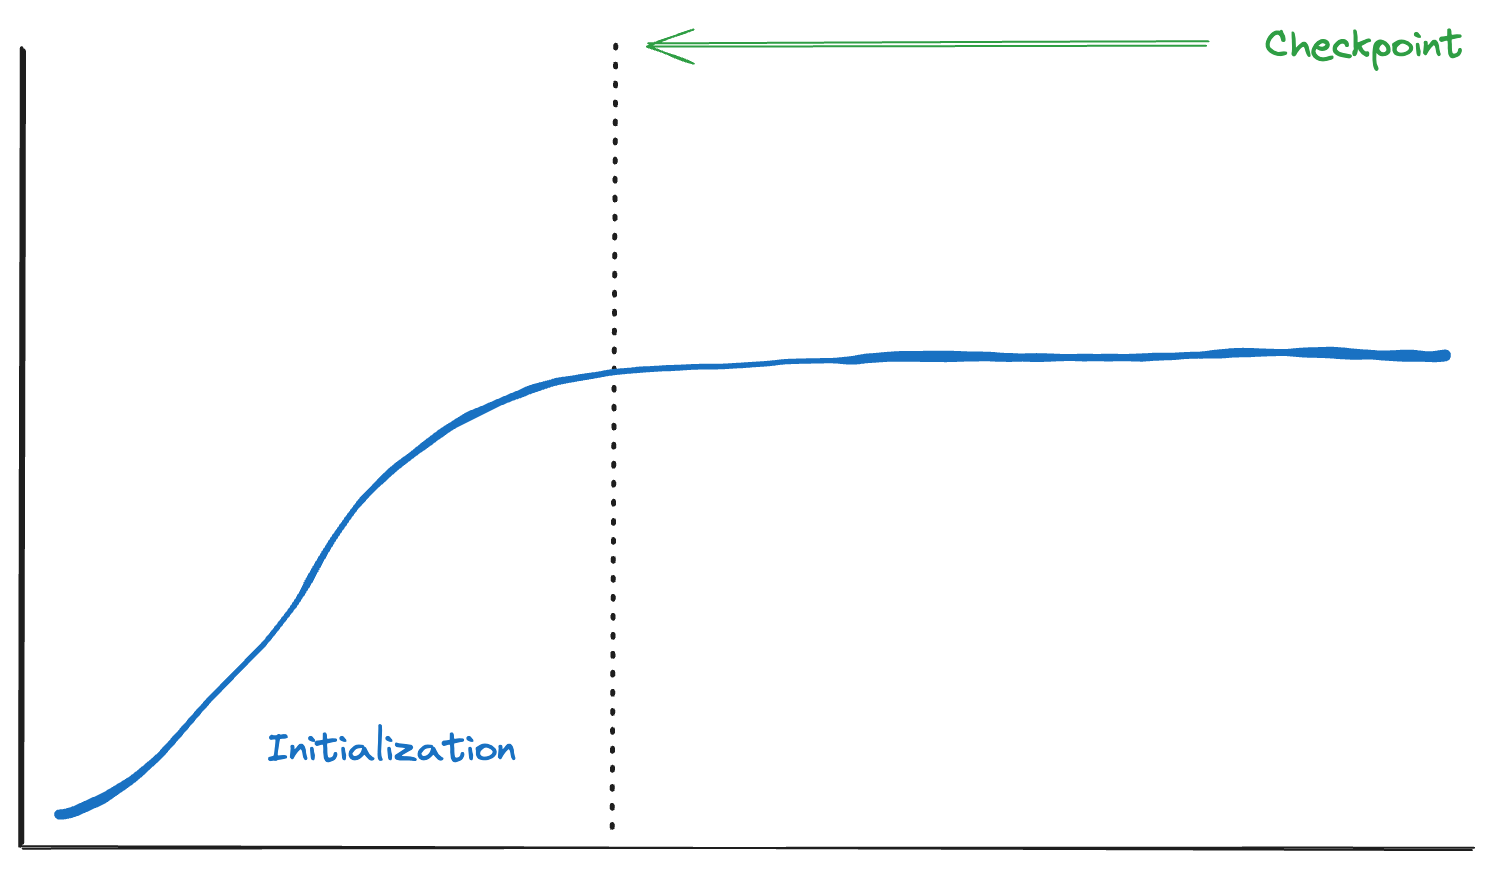
When a Java application runs, the JVM goes through a process of loading, initializing, and optimizing the code used by the application. However, each time the application is restarted, this process needs to be repeated, resulting in time and resource consumption. What if you could eliminate this initialization process and therefore remove the application's startup time and resource consumption?
One of the primary advantages of CRaC is its ability to create checkpoints within the application's execution flow. This allows the application to go through its initialization phase and, once warmed up and ready to go, a checkpoint can be taken. The checkpoint can then be used the next time the application needs to start up, eliminating the need to warm up the execution environment again.
I would encourage you to try this out in your applications and see what kind of performance gains you get. In many scenarios, you can expect up to two orders of magnitude faster performance. That is something to be really excited about!
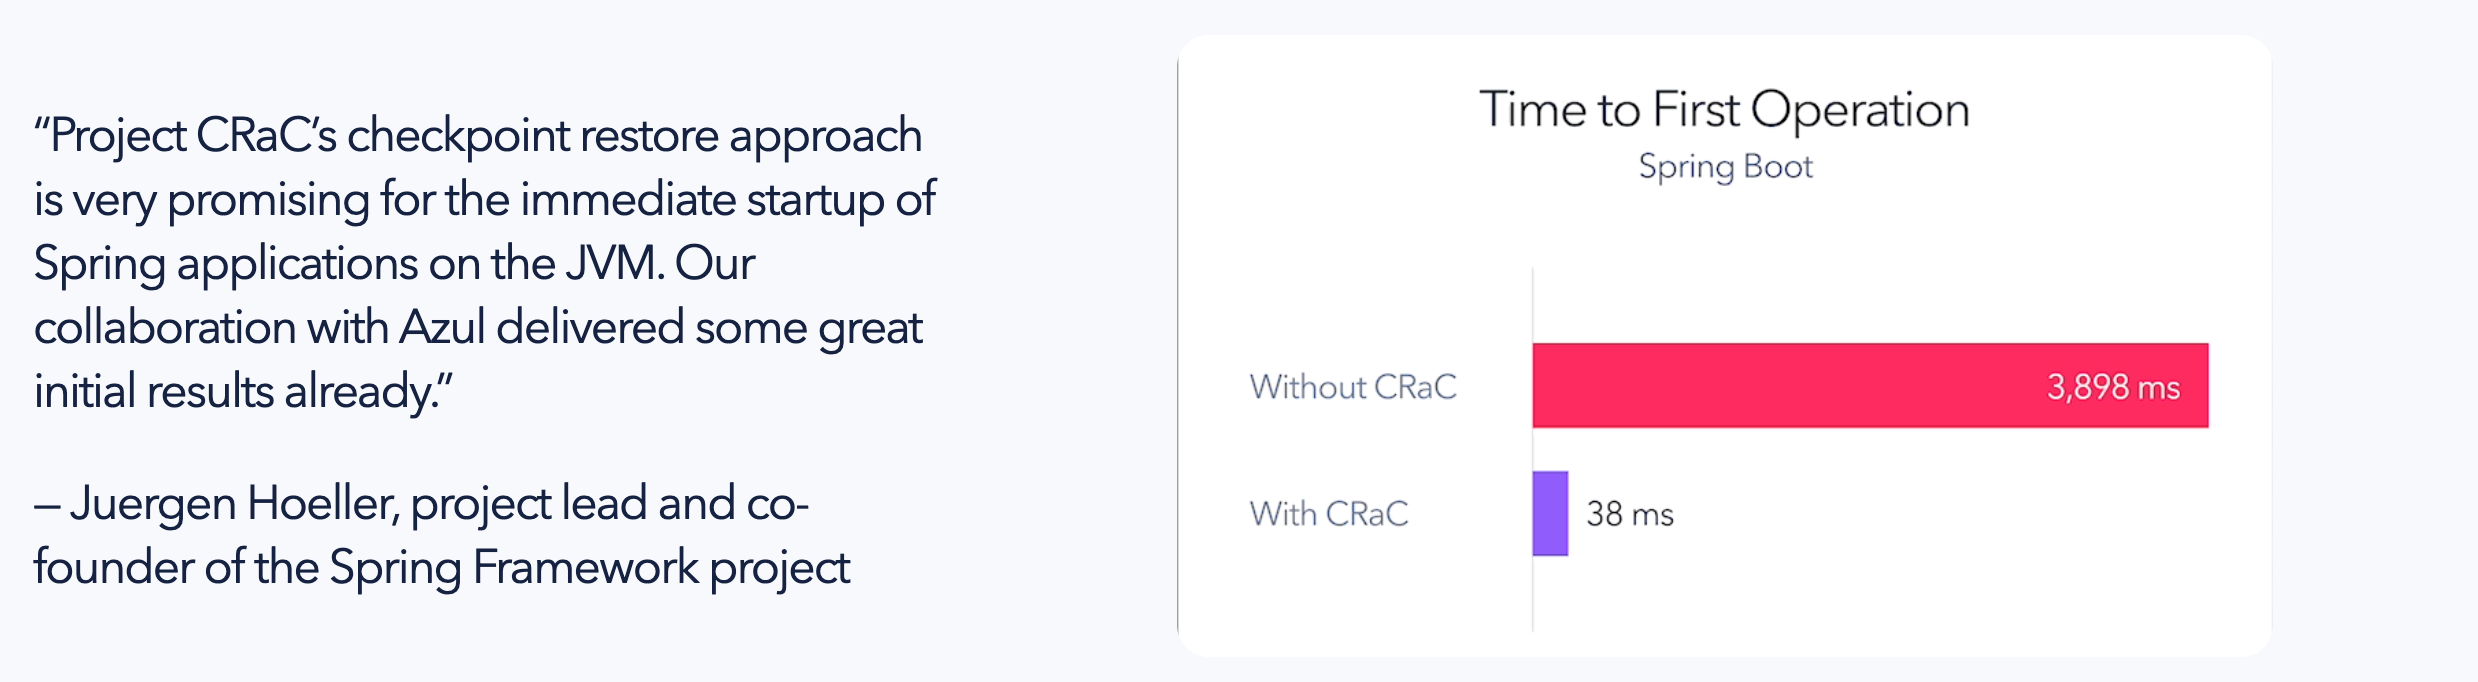
When comparing this to something like AOT, there are several advantages. First, you don't need to add hints to the AOT compiler. However, the major advantage, in my opinion, is that natively compiled applications make a closed world assumption at runtime, whereas applications using Project CRaC can still leverage all the dynamic capabilities of the JVM.
Spring Boot + Project CRaC Example
I mentioned this earlier, but this feature is built on top of a feature in Linux. If you're running Linux locally, you can get this working fairly simply. If you aren't, you need to run the application in a container. The important thing to note is that this is not something you're going to deal with during development. This is a Runtime Efficiency feature and something we can work together with our DevOps teams to implement in our CI/CD process. If you want to see this in action in a Spring Boot 3.2 application, you can check out the video I made with my friend DaShaun below.
Project Leydon and Class Data Sharing
This is fairly new project in the OpenJDK and its initiative is to improve the startup and warmup of Java applications. The Spring Team has already done some initial work at looking at Project Leydon in the JDK and where it might be useful to Spring Developers.
Through that exploration they found some interesting discoveries of the JDK’s CDS (”Class Data Sharing”) feature and it has materialized into a new feature that shipping in Spring Framework 6.1 and Spring Boot 3.2. If you’re interested in learning more check out the blog post below.
https://spring.io/blog/2023/12/04/cds-with-spring-framework-6-1
Client Abstractions
Spring has simplified complex tasks by abstracting the low-level communication layer into an easy-to-use API. This includes interacting with a database through the JDBC Template or Spring Data, as well as communicating with an external service using the RestTemplate or WebClient for HTTP requests. In Spring Boot 3.2, two new client abstractions have been introduced to further simplify these processes.
JDBC Client
Interacting with databases, reading and persisting data in Java has historically been complex. Factors like building JDBC URLs, managing database connections, and dealing with real-world application concerns such as connection pools need to be considered. Fortunately, Spring simplifies these tasks through its abstractions. One such abstraction is the JDBC template in Spring.
The JDBC template is a solid abstraction that simplifies database interaction. However, it can become verbose when building simple CRUD services based on resources. It requires a deep understanding of methods for communicating with a database, such as row mappers and column to field mapping, which can be tricky.
Despite these complexities, one main advantage is the complete control over SQL, which developers highly appreciate. This is where the newest addition, the JDBC client, comes in. It offers a fluent API that is easy to understand and read. One exciting feature of the JDBC client is its auto-configuration in Spring Boot 3.2. This means that we can simply request a bean in our application and get an instance of it without any hassle!
Here is an example of a Repository class that contains all of the CRUD methods for reading and persisting data to a database. Note that an instance of the JdbcClient is autowired in using constructor injection, and the code is made more readable thanks to the fluent API.
@Repository
public class PostRepository {
private final JdbcClient jdbcClient;
public PostRepository(JdbcClient jdbcClient) {
this.jdbcClient = jdbcClient;
}
public List<Post> findAll() {
return jdbcClient.sql("SELECT * FROM Post")
.query(Post.class)
.list();
}
public Optional<Post> findById(String id) {
return jdbcClient.sql("SELECT * FROM Post WHERE id = :id")
.param("id", id)
.query(Post.class)
.optional();
}
public void create(Post post) {
jdbcClient.sql("INSERT INTO Post(id,user_id,title,body) values(?,?,?,?)")
.params(List.of(post.id(), post.userId(), post.title(), post.body()))
.update();
}
public void update(Post post, String id) {
jdbcClient.sql("update Post set user_id = ?, title = ?, body = ? where id = ?")
.params(List.of(post.userId(), post.title(), post.body(), id))
.update();
}
public void delete(String id) {
jdbcClient.sql("delete from Post where id = :id")
.param("id", id)
.update();
}
}
If you’re interested in diving deeper into the JDBC Client you can check out this blog post or watch the video below.
JDBC Client vs Spring Data
After discussing the new JDBC Client in Spring Boot 3.2, I was asked about the difference between the JDBC Client and Spring Data JDBC. This presented a good opportunity to explore the various options available in Java and Spring for accessing and persisting data to a database.
To illustrate this, I created an example where we connect to a database in Java and explained the origins of the original JDBC Template abstraction in Spring. Then, I demonstrated how to access the same database in Spring using the JDBC Template. While discussing some of the issues with the JDBC Template, I introduced the new JDBC Client in Spring Boot 3.2 and highlighted how its simple and fluent API simplifies database access.
Finally, we delved into Spring Data and how the repository pattern can handle the mundane CRUD functionality, freeing you to focus on your business requirements.
Multiple DataSources in Spring
Another question that arose with the new JDBC Client in Spring Boot 3.2 was whether it is possible to use multiple JDBC Clients when working with multiple DataSources in Spring. I found this to be a great question and a perfect opportunity to discuss how a DataSource and JDBC Client are configured for you in Spring.
REST Client
Over the years, Spring has offered various solutions for dealing with the complexities of working with web services, particularly RESTful services. In Spring Framework 3.0, the Rest Template was introduced as a client for making synchronous HTTP requests. This API simplified the interaction with web services by abstracting the underlying HTTP connection, making it easier for developers to perform HTTP operations and parse responses. However, as requirements grew, so did the API, eventually making it more difficult to use.
In Spring Framework 5, Spring WebFlux was introduced as a way to create fully asynchronous and non-blocking applications. Alongside this release, the new Web Client was introduced to address the limitations of the RestTemplate in a non-blocking and reactive programming environment. Drawing from the lessons learned with the RestTemplate, the Spring team improved upon it with a simple-to-learn, fluent API.
Developers really enjoyed the easy to use fluent API of the Web Client. So much that they were bringing in the reactive stack to their blocking MVC applications just to take advantage of the Web Client. Fast forward to Spring Boot 3.2 and the new Rest Client offers a similar experience in imperative style applications.
To get started with rest client you can create an instance using the Rest Client Builder and setting the base url for your service.
private final RestClient restClient;
public PostService(RestClient.Builder builder) {
this.restClient = builder
.baseUrl("https://jsonplaceholder.typicode.com/")
.build();
}
As a developer, one of the features that I really appreciate about the new Rest Client is how intuitive its API is. When I type "rest client dot", I am presented with sensible methods like get, post, put, and delete. This eliminates any confusion I had about which overloaded method to choose from, simplifying everything for me.
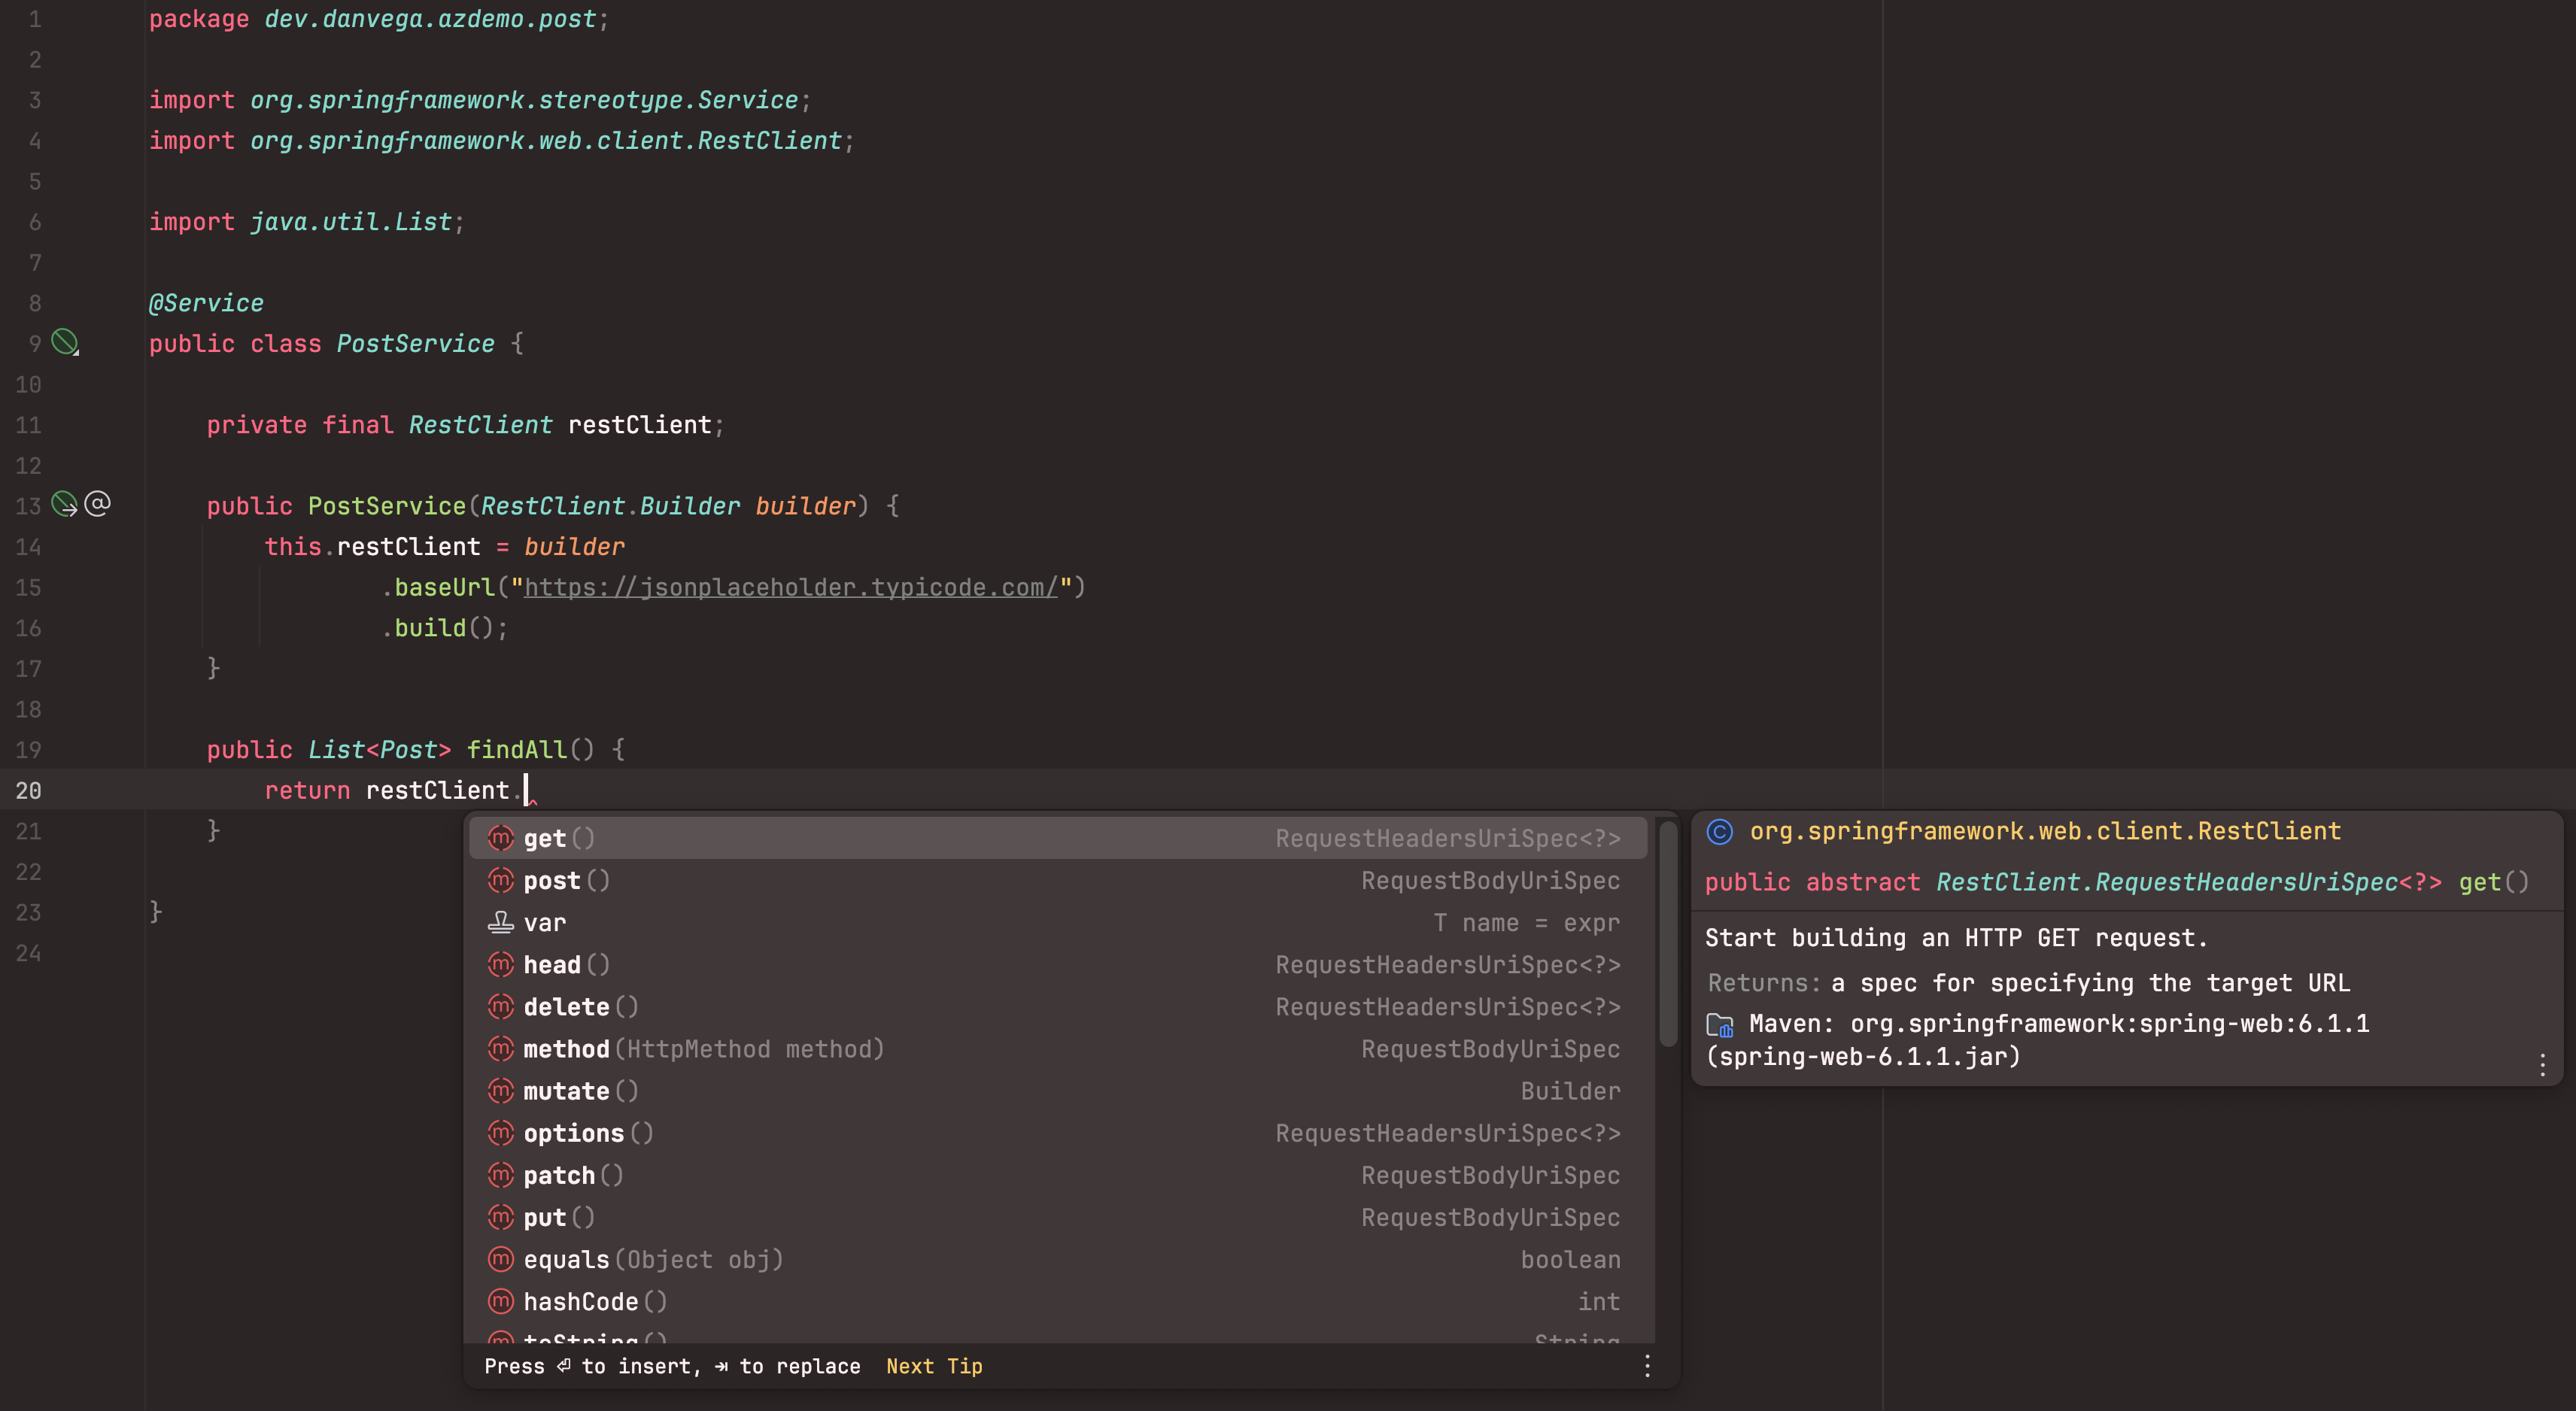
After calling the get() method, we can use the fluent API to complete our call. As you can see from the methods below, this is very readable, even for someone who has never used it before.
@Service
public class PostService {
private final RestClient restClient;
public PostService(RestClient.Builder builder) {
this.restClient = builder
.baseUrl("https://jsonplaceholder.typicode.com/")
.build();
}
public List<Post> findAll() {
return restClient.get()
.uri("/posts")
.retrieve()
.body(new ParameterizedTypeReference<>(){});
}
public ResponseEntity<Post> findById(Long id) {
return restClient.get()
.uri("/posts/{id}", id)
.retrieve()
.toEntity(Post.class);
}
}
If you’re interested in learning more about the Rest Client you check out this post or watch the video below.
Http Interface Clients
Spring Framework 6 and Spring Boot 3 have introduced HTTP Interface Clients. With the Spring Framework, you can define an HTTP service as a Java interface using HTTP exchange methods. By generating a proxy that implements this interface, you can handle the HTTP exchanges. This simplifies remote access to HTTP services and provides the flexibility to choose an API style, such as synchronous or reactive.
This was great, but it was dependent on the Web Client, so you needed to bring in that dependency into your Spring MVC applications for it to work. In Spring Boot 3.2 this is now based on the new Rest Client if you’re in a MVC application.
Instead of having to write the boilerplate low level code to communicate with another service you can just define the method contracts using the @HttpExchange annotation or one of the specialized versions of it.
public interface ArticleClient {
@GetExchange("/articles")
ResponseEntity<List<Article>> findAll();
@GetExchange("/articles/{id}")
Optional<Article> findOne(@PathVariable Integer id);
@PostExchange("/articles")
void create(@RequestBody Article article);
@PutExchange("/articles/{id}")
void update(@RequestBody Article article, @PathVariable Integer id);
@DeleteExchange("/articles/{id}")
void delete(@PathVariable Integer id);
}
I liken this to the Spring Data project where we can use the repository abstraction to get the CRUD functionality out of the box freeing us up to focus on the business requirements of the application.
I had a good conversation on Spring Office Hours with Olga and Rossen from the Spring team about the history of clients in Spring and Http Interfaces.
Observability
Observability was a major theme in Spring Boot 3.0 and will continue to be important for the framework and projects in the ecosystem. But what exactly is it, and why should you care about it?
Observability is the ability to observe the internal state of a running system from the outside. It consists of three pillars: logging, metrics, and traces.
It is not enough to simply build an application and release it into production hoping for the best. You need to have visibility into your application's inner workings so that you can proactively address issues instead of reacting to customer complaints.

Observation API
One of the most significant changes in Spring Boot 3.0 was the introduction of a unified Observation API. This API, which is used by the framework internally, is now also available to developers. The purpose of this API is to allow us to instrument our applications. For each instrumentation, we can perform the following actions:
- Emit Log Messages
- Start & Stop Timers
- Increment Counters
- Start & Stop Spans
- Signal Errors
If you want to do metrics and tracing, you would typically need to instrument your application twice. This can result in a lot of boilerplate code, which may discourage you from implementing observation in the first place.To create an observation, you can use the createNotStarted method of the Observation class. This method simplifies the process of observing code and captures all the necessary information. However, be cautious as this approach can lead to code pollution if you instrument code excessively.
@SpringBootApplication
public class Application {
private static final Logger log = LoggerFactory.getLogger(Application.class);
public static void main(String[] args) {
SpringApplication.run(Application.class, args);
}
@Bean
CommandLineRunner commandLineRunner(ObservationRegistry registry) {
return args -> {
// Create an Observation and observe your code!
Observation.createNotStarted("user.name", registry)
.contextualName("getting-user-name")
// let's assume that you can have 3 user types
.lowCardinalityKeyValue("userType", "userType1")
// let's assume that this is an arbitrary number
.highCardinalityKeyValue("userId", "1234")
// this is a shortcut for starting an observation, opening a scope,
.observe(() -> log.info("Hello"));
};
}
}
Observability Improvements in Spring Boot 3.2
Prior to Spring Boot 3.2 you could use the @Observed annotation but you to do some manual configuration to make this happen. In Spring Boot 3.2 you can now use Micrometers [@Timed](https://micrometer.io/docs/concepts#_the_timed_annotation), @Counted, @NewSpan, @ContinueSpan and [@Observed](https://micrometer.io/docs/observation#_using_annotations_with_observed) annotations. The aspects for them are now auto-configured if you have AspectJ on the classpath. You can do this by adding the spring-boot-starter-aop dependency to your project.
<dependency>
<groupId>org.springframework.boot</groupId>
<artifactId>spring-boot-starter-aop</artifactId>
</dependency>
Instrumenting the same code becomes much cleaner with the @Observed annotation!
@Bean
@Observed(name = "user.name", contextualName = "getter-user-name")
CommandLineRunner commandLineRunner(ObservationRegistry registry) {
return args -> {
log.info("Hello, World!");
};
}
Conclusion
This article covers various topics related to Spring Boot 3.2. It introduces virtual threads as a solution for scalability issues in concurrent programming, discusses the Coordinated Restore at Checkpoint (CRaC) project for faster startup time and reduced resource consumption, explores the new client abstractions for JDBC and REST in Spring Boot, and highlights observability improvements. It also provides links to articles, videos, and blog posts for further reading and examples. I hope you enjoyed this and as always friends
Happy Coding
Related Articles
GraphQL for Java Developers
Learn how to build scalable GraphQL APIs with Java 26 and Spring Boot 4. This course walks you through schema-first development, batch loading, unions, Query by Example, AOT repositories, and more.
Spring, Build Me a Coding Agent
Learn how to build an autonomous coding agent in Spring AI using the Spring AI Agent Utils library. This tutorial walks you through creating a CLI-based agent with file system access, shell commands, and skills.
Giving Your Spring AI Agents a Real Browser with the Browserbase Spring Boot Starter
Most AI agents can search the web. But what happens when they need to actually use it? I built a Spring Boot Starter for Browserbase that gives your agents a real, headless browser in three lines of configuration, plus a deep research agent to show it off.