A Comprehensive Guide to Building RESTful Web Service with Spring Boot
Today, we'll be going over a tutorial on how to build a RESTful web service using Spring Boot. This is perfect for visual learners who may prefer to start with a tutorial before diving into the actual Spring.io documentation. So, let's dive into the tutorial and start building our web service.
Building a RESTful Web Service: Prerequisites
Before we get started, let's make sure you have the following tools installed and ready to go:
- A favorite text editor or IDE (we'll be using IntelliJ Ultimate Edition)
- JDK 1.8 or later
With those in place, we're ready to get started on building our web service!
Step 1: Setting Up the Project
To ensure a smooth start, we'll begin by creating our project using the Spring Initializer. This will automatically configure our build system, dependencies, and folder structure for us.
Here's what to do:
- Head to start.spring.io
- Select
Maven,Java, and choose the latest stable version of Spring Boot - Set the Group to
com.exampleand Artifact torest-service - Add the
Webdependency and clickGenerate - Download and unzip the generated project
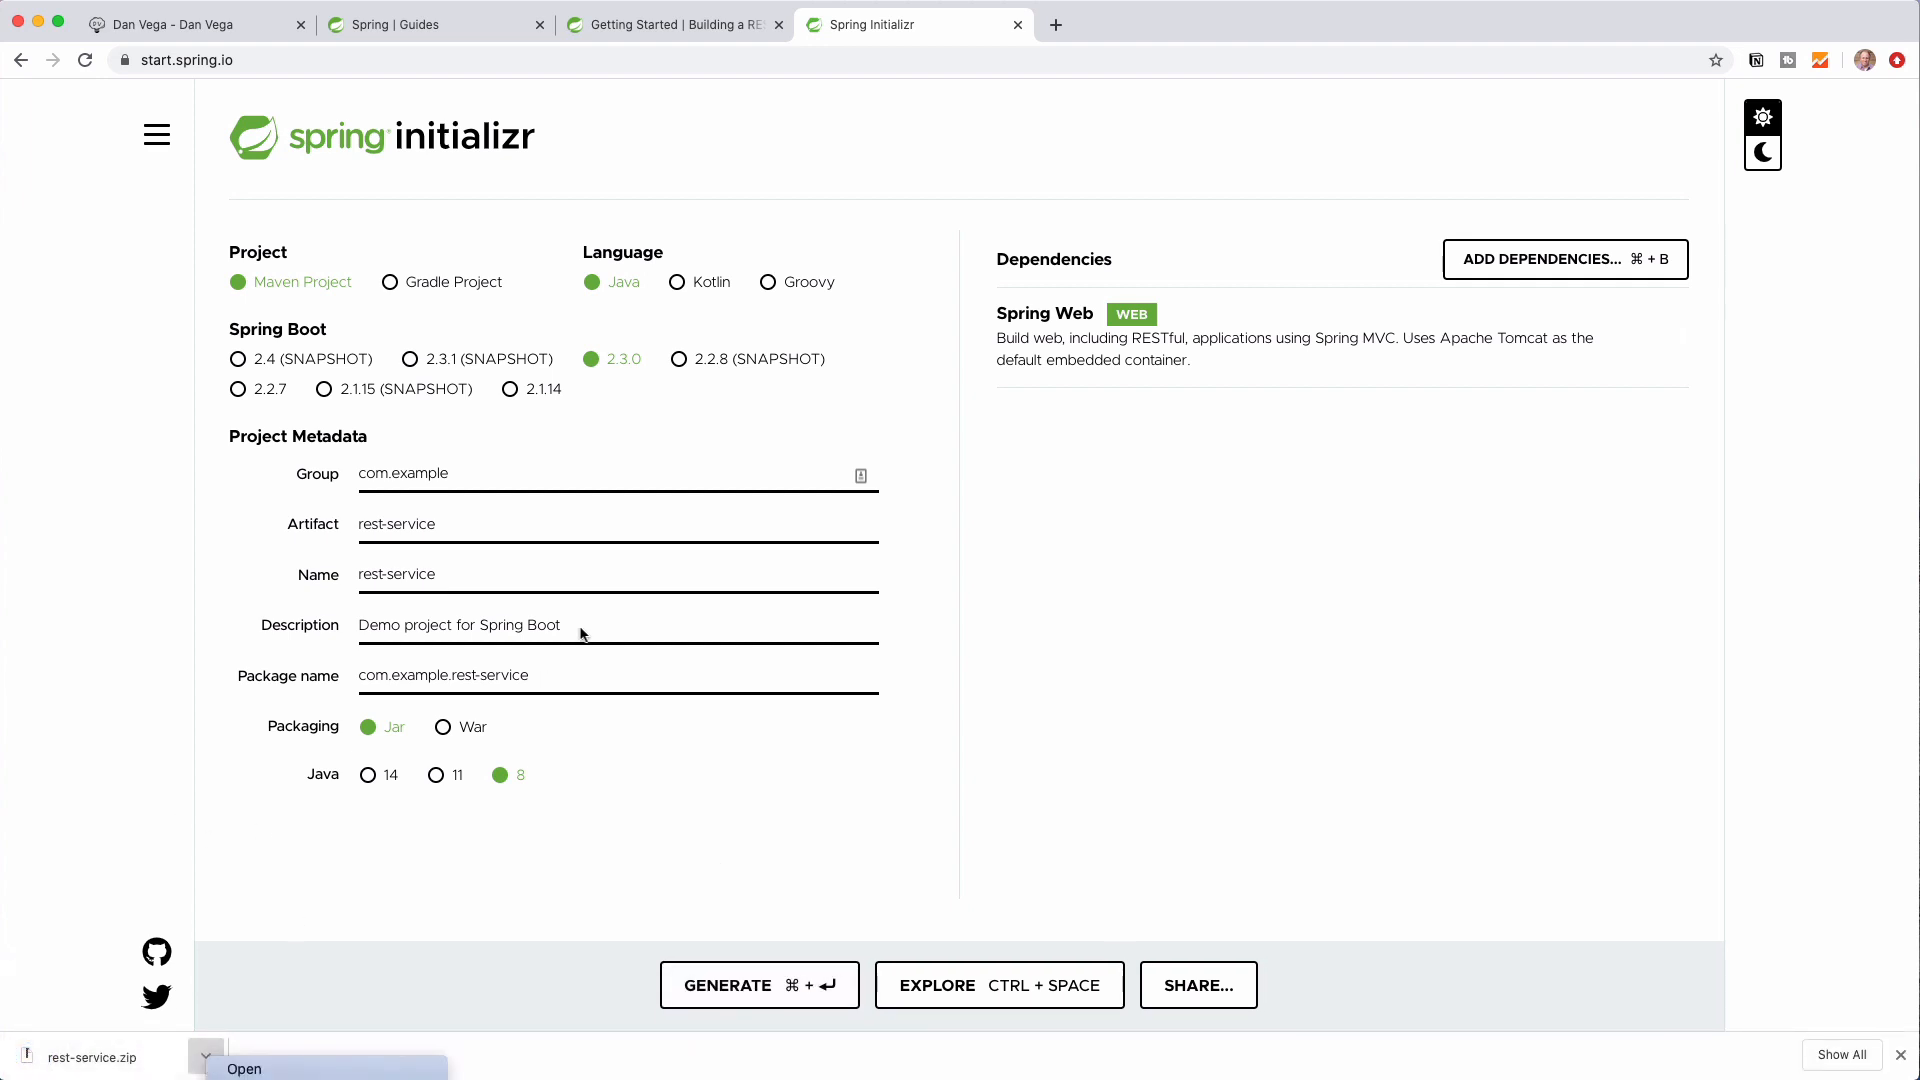
Once that's done, open the project in your favorite IDE, and you're ready for the next step.
Step 2: Creating a Model
With our project structure in place, we need to create a model class to describe the data we'll be working with. In this case, it will be a simple greeting with an ID and some content.
To create a Greeting class with the appropriate fields, follow these steps:
- Navigate to the
mainpackage in your project - Create a new class named
Greeting - Add
private final long idandprivate final String contentas fields - Generate a constructor and getters for the fields
public class Greeting {
private final long id;
private final String content;
public Greeting(long id, String content) {
this.id = id;
this.content = content;
}
public long getId() {
return id;
}
public String getContent() {
return content;
}
}
And that's it for our Greeting class! Now, let's move on to creating the controller that will define the behavior of our web service.
Step 3: Creating a Greeting Controller
In this step, we'll create our GreetingController class, which will handle the interaction between our web service and its users.
Here's how to set up the GreetingController:
- Navigate to the
mainpackage in your project - Create a new class named
GreetingController - Add the
@RestControllerannotation at the beginning of the class - Create a
private static final String templatewith an initial value ofHello, %s! - Create a
private final AtomicLong counterwith an initial value ofnew AtomicLong() - Add a
greetingmethod with a@GetMapping("/greeting")annotation and a singleStringparameter annotated with@RequestParam(value = "name", defaultValue = "World")
@RestController
public class GreetingController {
private static final String template = "Hello, %s!";
private final AtomicLong counter = new AtomicLong();
@GetMapping("/greeting")
public Greeting greeting(@RequestParam(value = "name", defaultValue = "World") String name) {
return new Greeting(counter.incrementAndGet(), String.format(template, name));
}
}
Now that we've set up our GreetingController, let's start the application and test our endpoint.
Step 4: Testing the Application
To test our application, run the main method in your RestServiceApplication class to start the server. You can then access the /greeting endpoint using a browser or tools like Postman.
Once the application is up and running, navigate to http://localhost:8080/greeting and verify that you receive the expected JSON response with an ID and content. You can also test the name parameter by appending ?name=YourName to the endpoint URL.
Step 5: Building an Executable JAR
Now that our web service is functional, it's time to package it as an executable JAR. This will allow us to easily deploy and run the web service on any machine with Java installed.
To package the application as a JAR, follow these steps:
- Open a terminal and navigate to your project directory
- Run
./mvnw package(mvnw.cmd packageon Windows) to build the JAR file - Verify that a JAR file is generated in the
targetdirectory
You can now run the web service using the command java -jar target/rest-service-0.0.1-SNAPSHOT.jar.
Wrapping Up
Congratulations! You've just built a simple RESTful web service using Spring Boot!
This tutorial covered the basics of creating a RESTful web service, but there's plenty more to learn. The Spring.io guides provide numerous tutorials and examples to help you continue building your skills and expanding your knowledge of Spring Boot and its many features.
Remember to leave a comment below if you enjoyed this tutorial, and let us know if you'd like to see more like this!
Happy coding!
Related Articles
Giving Your Spring AI Agents a Real Browser with the Browserbase Spring Boot Starter
Most AI agents can search the web. But what happens when they need to actually use it? I built a Spring Boot Starter for Browserbase that gives your agents a real, headless browser in three lines of configuration, plus a deep research agent to show it off.
Building a Spring Initializr Terminal UI with Java
How I built a terminal user interface for the Spring Initializr using Tambu UI, a new Java TUI framework, and GraalVM native images to streamline my development workflow.
OpenTelemetry with Spring Boot 4: The New Starter You've Been Waiting For
Learn how to use the new spring-boot-starter-opentelemetry in Spring Boot 4 to add observability with traces, metrics, and logs—no Actuator required.