I'm getting ready to leave for Commit your Code Conference 2025, and I wanted to share the demo I'm using in my talk about building AI-enabled Spring applications with the Model Context Protocol (MCP). What started as conference demo material turned into something I think every Spring developer should know about, especially with how much easier it's become in Spring AI 1.1.0-M2.
Introduction: Why MCP Matters for Java Developers
Remember the last time you tried to give an AI assistant access to your application's data? If you're like most developers, you probably ended up writing custom integrations, dealing with authentication headaches, and wondering if there's a better way. Well, there is, and it's called the Model Context Protocol (MCP).
MCP is like a universal adapter between your applications and AI assistants. Instead of building custom integrations for each AI tool, you build one MCP server that any MCP-compatible client can connect to. Think of it as the USB-C of AI integrations: one standard that works everywhere.
And here's the exciting part: Spring AI 1.1.0-M2 just made building MCP servers incredibly simple. No more manual callback registrations, no complex setup. Just annotate your methods and you're ready to go.
What We're Building
In this tutorial, we'll build an MCP server that exposes conference session data to AI assistants. By the end, you'll be able to ask questions like "How many sessions are happening on Thursday?" or "Which talks are about AI?" and get accurate answers from your own data.
Want to follow along? You can grab all the session data and complete code from the GitHub repository: github.com/danvega/cyc. This includes the JSON data file with all the conference sessions, so you can run the exact same demo.
Prerequisites
Before we dive in, make sure you have:
- Java 21 or higher
- Maven or Gradle
- Your favorite IDE (Spring Tool Suite, IntelliJ IDEA, VS Code with Spring extensions)
- Basic knowledge of Spring Boot
Step 1: Create Your Spring Boot Project
The easiest way to get started is using Spring Initializr. Head to start.spring.io and configure your project:
- Project: Maven (or Gradle if you prefer)
- Language: Java
- Spring Boot: 3.5.5 or higher
- Java: 21
- Dependencies:
- Spring Web
- Model Context Protocol Server
Click "Generate" and open the project in your IDE.
Step 2: Understanding What Spring AI Provides
Before we write code, let's understand what Spring AI gives us out of the box. The Model Context Protocol Server dependency provides:
- Automatic discovery of MCP tools, resources, and prompts
- Built in transports (stdio and HTTP streamable)
- Simple annotations to mark your methods as MCP primitives
- Automatic JSON serialization for complex return types
Here's something interesting: the official Java SDK for MCP was actually donated to Anthropic by the Spring team. This SDK works both with Spring applications (where you get all the Spring magic) and with plain Java applications if you prefer a lighter approach. The Spring AI integration builds on top of this SDK to give you the best possible developer experience.
The best part? In version 1.1.0-M2, you no longer need to manually register callbacks. Spring's component scanning handles everything automatically.
Step 3: Create Your First MCP Tool
Let's create a simple tool that exposes conference data. Create a new class called SessionTools:
@Component
public class SessionTools {
private static final Logger log = LoggerFactory.getLogger(SessionTools.class);
private Conference conference;
private final ObjectMapper objectMapper;
public SessionTools(ObjectMapper objectMapper) {
this.objectMapper = objectMapper;
}
@McpTool(
name = "cyc-get-conference-data",
description = "Get all conference data including sessions, tracks, rooms and conference details"
)
public Conference getConferenceData() {
return conference;
}
@PostConstruct
public void init() {
log.info("Loading Sessions from JSON file 'sessions.json'");
try (InputStream inputStream = getClass().getResourceAsStream("/data/sessions.json")) {
var jsonNode = objectMapper.readTree(inputStream);
var conferenceNode = jsonNode.get("conference");
this.conference = objectMapper.treeToValue(conferenceNode, Conference.class);
log.info("Sessions loaded successfully: {} sessions",
conference.sessions() != null ? conference.sessions().size() : 0);
} catch (IOException e) {
log.error("Failed to read JSON data", e);
throw new RuntimeException("Failed to read JSON data", e);
}
}
}
Let's break down what's happening here:
- @Component: This makes our class a Spring bean, automatically discovered and registered
- @McpTool: This annotation exposes our method as an MCP tool
- name: A unique identifier for your tool
- description: Helps AI understand when to use this tool
Step 4: Define Your Data Model
Create simple record classes for your data:
public record Conference(
String name,
Integer year,
List<String> dates,
String location,
List<String> tracks,
List<String> rooms,
List<Session> sessions
) {}
public record Session(
String title,
String day,
String time,
String type,
String[] speakers,
String room,
String description
) {}
Records are perfect for MCP servers because they're immutable, serializable, and concise.
Step 5: Add More Specific Tools
Let's add some more focused tools that AI can use for specific queries:
@Component
public class SessionAnalysisTools {
@Autowired
private SessionTools sessionTools;
@McpTool(
name = "cyc-sessions-by-date",
description = "Returns the count of sessions by date"
)
public Map<String, Integer> getSessionsByDate() {
Conference conference = sessionTools.getConferenceData();
return conference.sessions().stream()
.collect(Collectors.groupingBy(
Session::day,
Collectors.summingInt(s -> 1)
));
}
@McpTool(
name = "cyc-sessions-by-track",
description = "Returns sessions for a specific track"
)
public List<Session> getSessionsByTrack(String track) {
Conference conference = sessionTools.getConferenceData();
return conference.sessions().stream()
.filter(session -> session.type() != null &&
session.type().equalsIgnoreCase(track))
.collect(Collectors.toList());
}
}
Step 6: Configure Your Application
In your application.properties, you can configure the transport and other settings:
# MCP Server Configuration
spring.ai.mcp.server.stdio=true
spring.ai.mcp.server.type=sync
spring.ai.mcp.server.name=cyc-mcp
spring.ai.mcp.server.version=0.0.1
# Disable banner and logging for STDIO transport
spring.main.banner-mode=off
logging.level.root=OFF
For HTTP transport (useful for web integrations):
spring.ai.mcp.server.transport=http
server.port=8080
Step 7: Build and Test Your MCP Server
Building the Executable JAR
./mvnw clean package
This creates an executable JAR in the target directory.
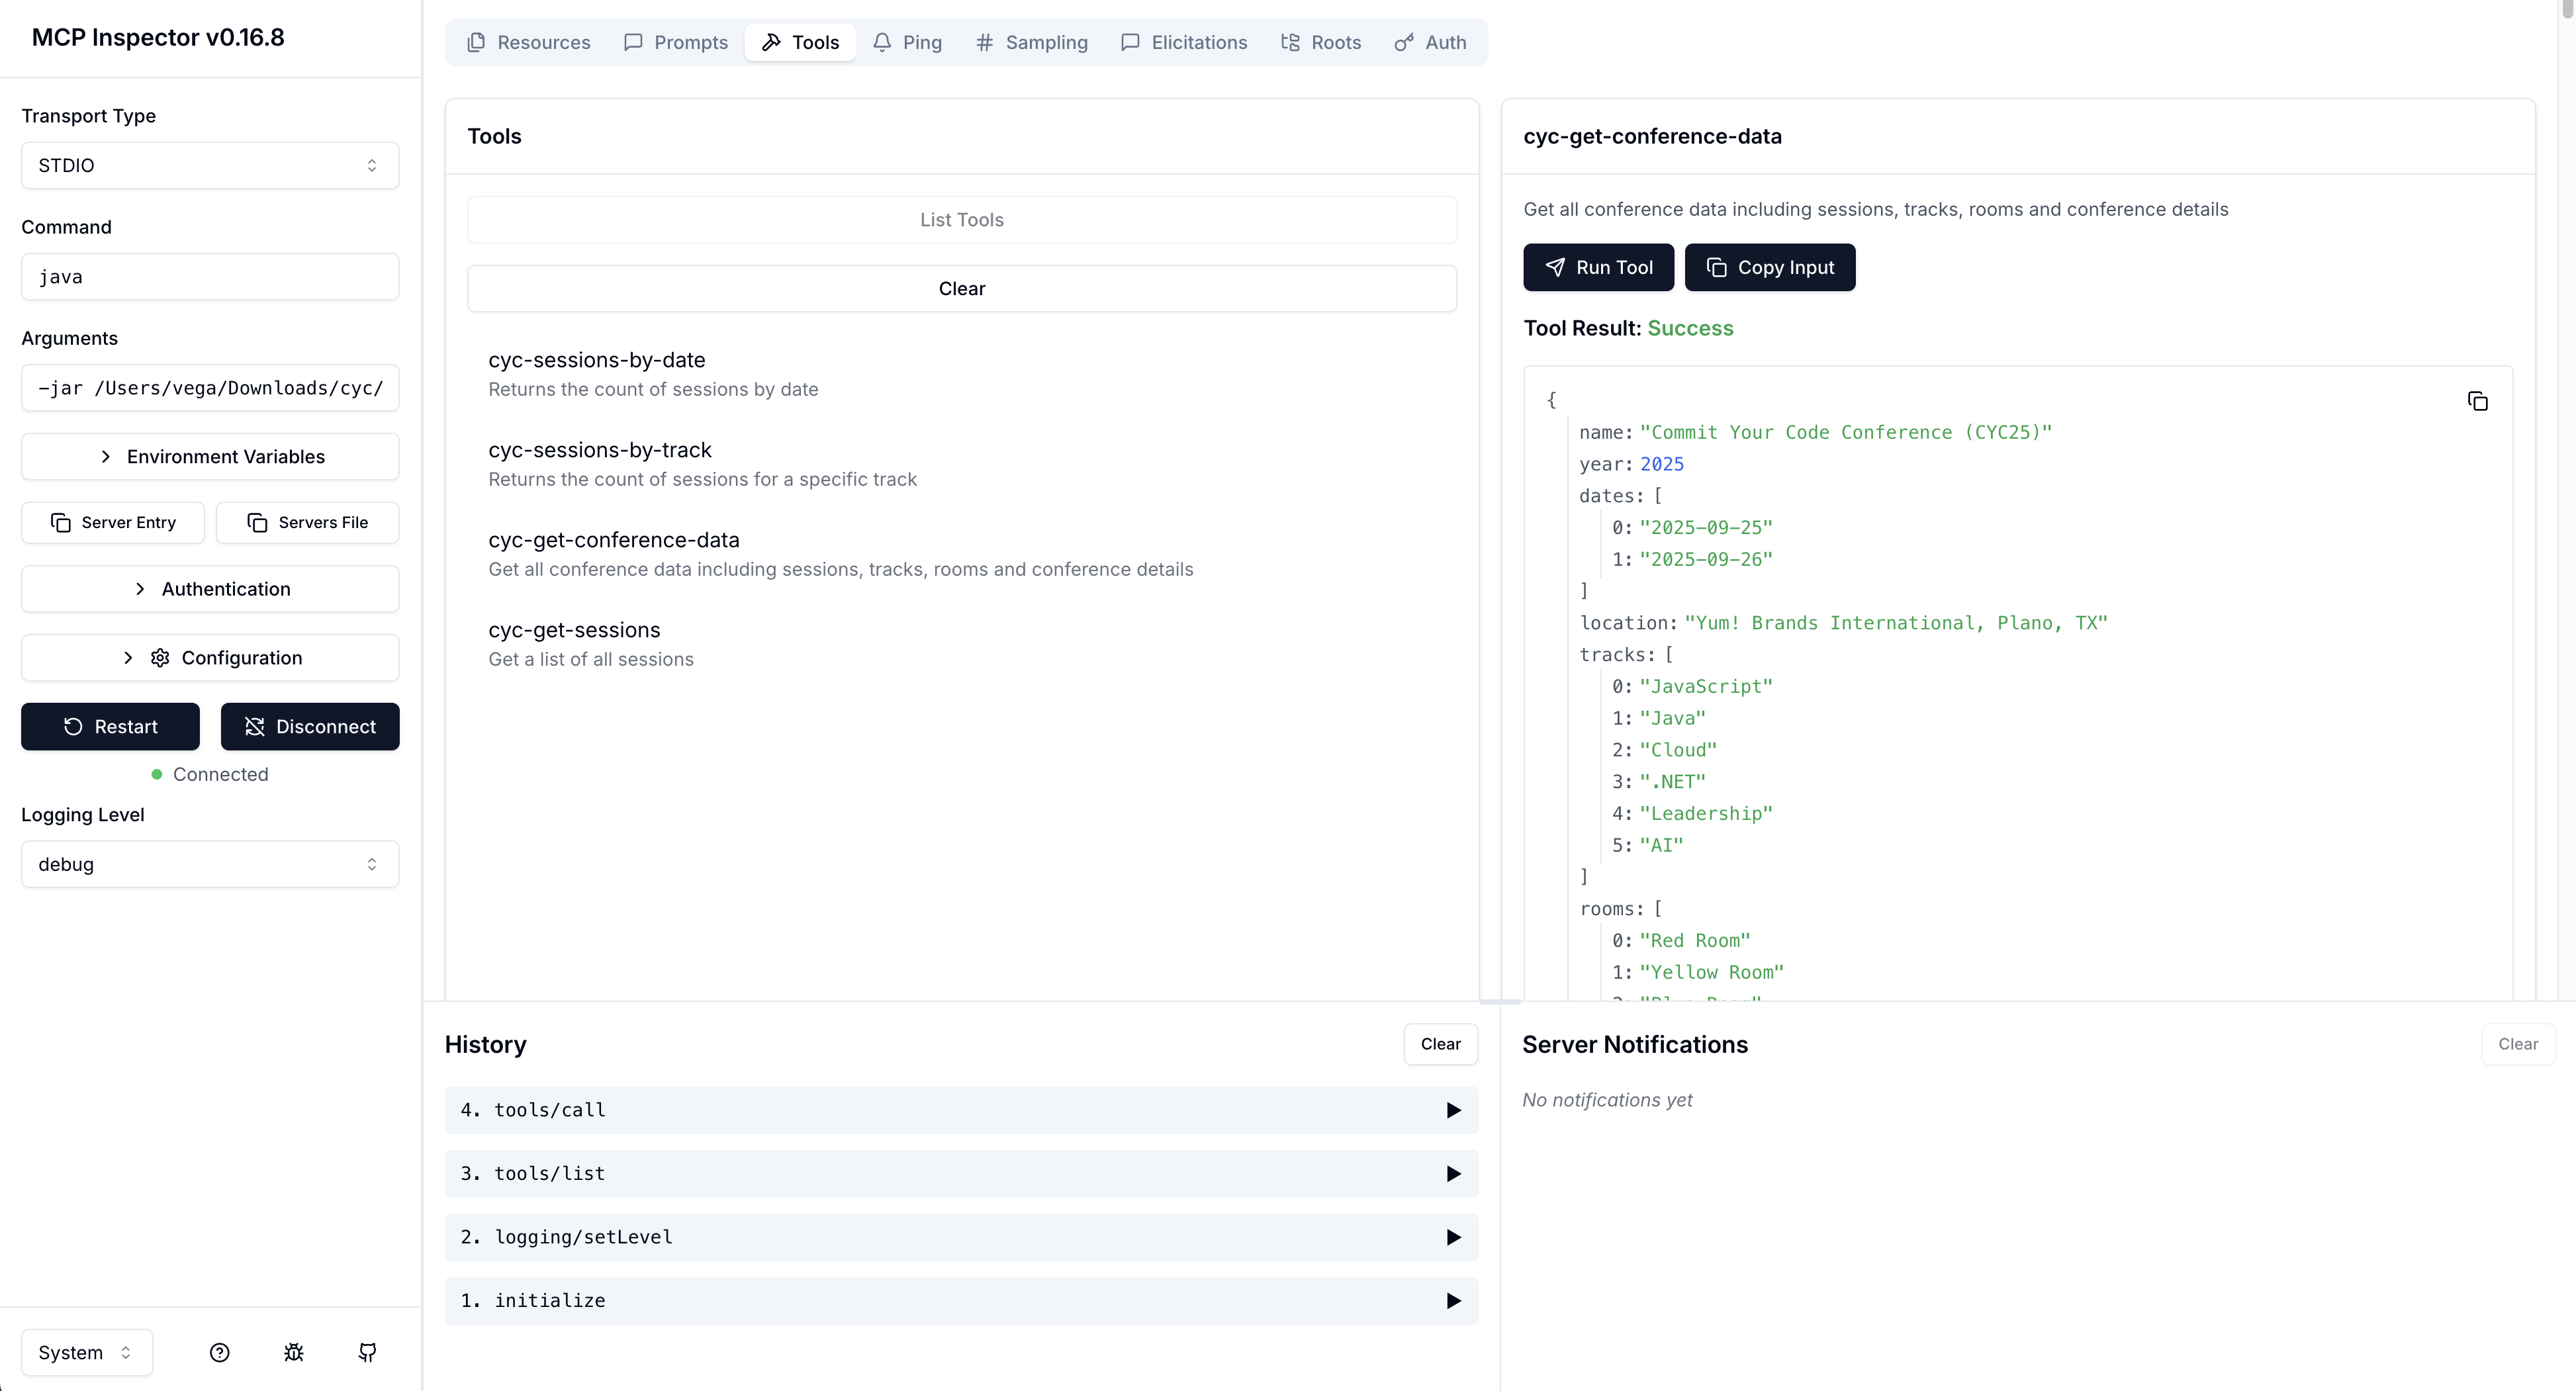
Testing with MCP Inspector
The MCP Inspector is a great tool for testing your server. Install it and configure it to run your JAR:
java -jar target/cyc-mcp-0.0.1-SNAPSHOT.jar
You should see your tools listed and be able to execute them directly.
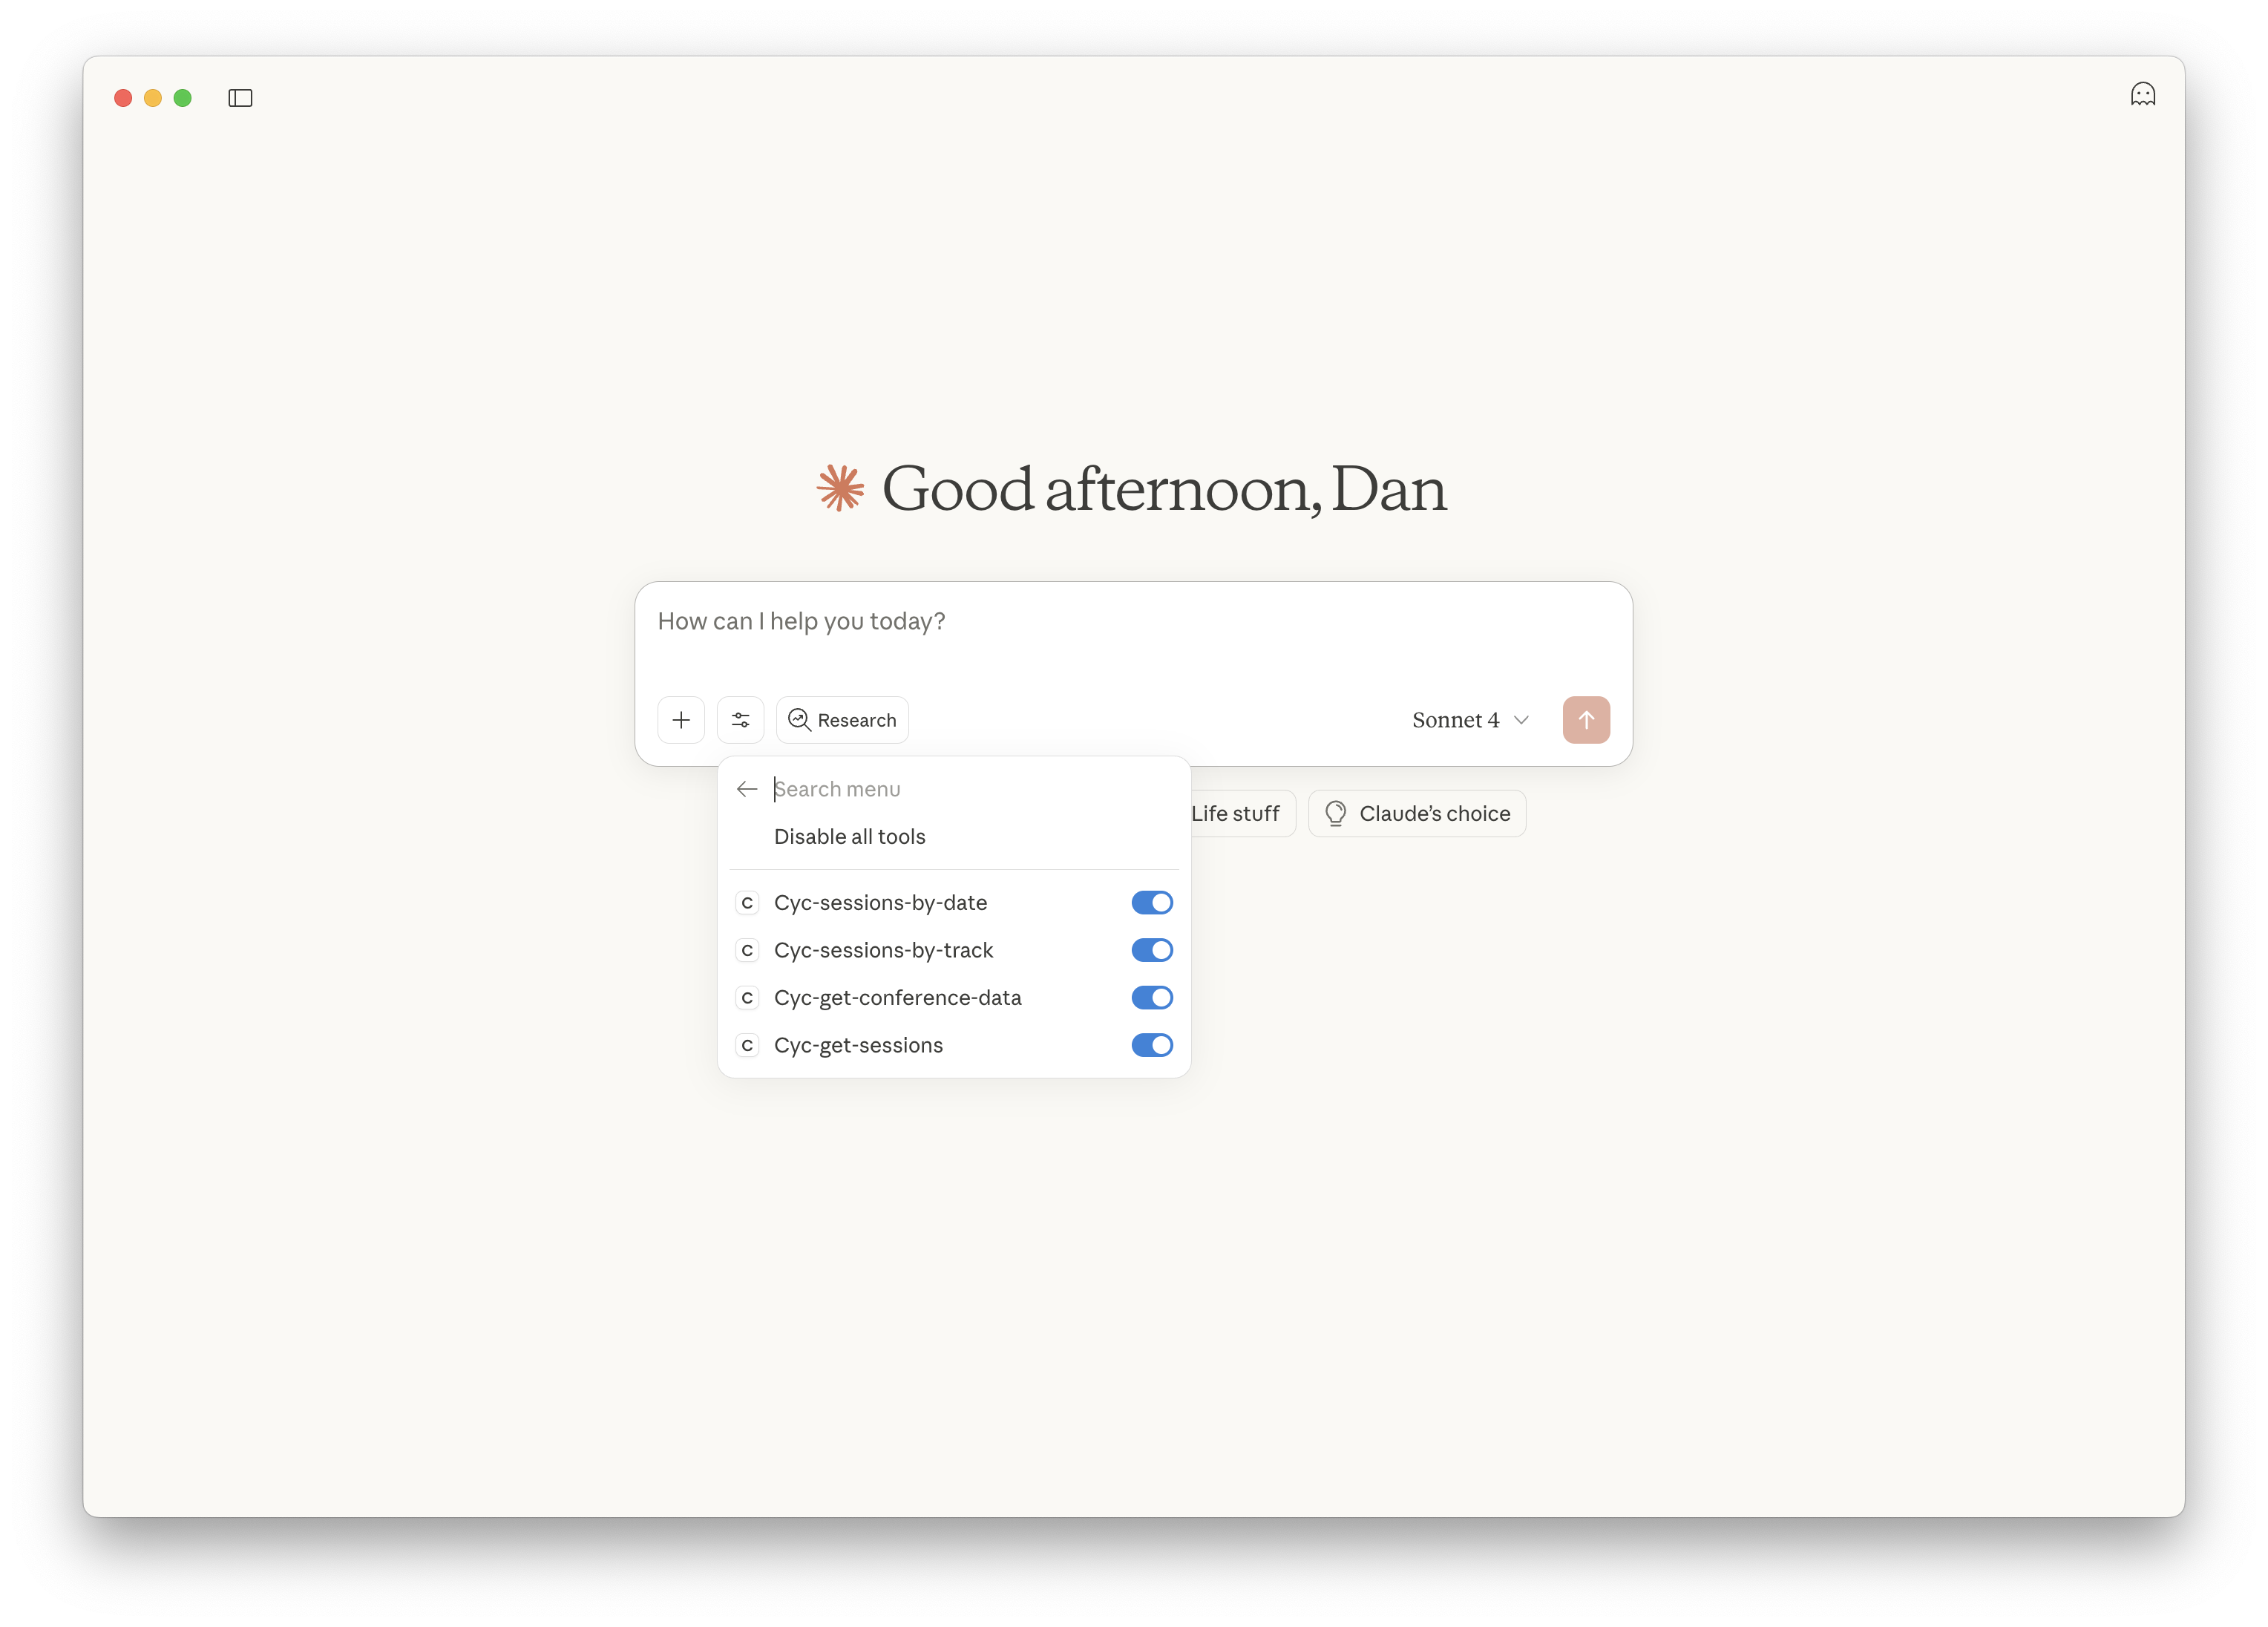
Configuring with Claude Desktop
To use your MCP server with Claude Desktop, add this to your Claude configuration file (~/Library/Application Support/Claude/claude_desktop_config.json on macOS):
{
"mcpServers": {
"cyc-conference": {
"command": "java",
"args": ["-jar", "/path/to/your/cyc-mcp.jar"]
}
}
}
Restart Claude Desktop, and you'll see your MCP server available in the interface.
Step 8: Adding Resources and Prompts
MCP isn't just about tools. You can also expose resources (data) and prompts (templates):
@Component
public class ConferenceResources {
@McpResource(
uri = "conference://schedule",
name = "Conference Schedule",
description = "Full conference schedule with all sessions",
mimeType = "application/json"
)
public String getSchedule() {
// Return your conference schedule as JSON
return "{ \"schedule\": [...] }";
}
}
@Component
public class ConferencePrompts {
@McpPrompt(
name = "session-recommender",
description = "Helps recommend sessions based on user interests"
)
public String getSessionRecommenderPrompt() {
return """
You are a helpful conference assistant. Based on the user's interests
and background, recommend relevant sessions from the conference.
Consider factors like: technical level, track preferences, and time constraints.
""";
}
}
Testing Your MCP Server
Write simple tests to ensure your tools work correctly:
@SpringBootTest
class SessionToolsTest {
@Autowired
private SessionTools sessionTools;
@Test
void getConferenceDataReturnsValidData() {
Conference conference = sessionTools.getConferenceData();
assertThat(conference).isNotNull();
assertThat(conference.name()).isEqualTo("Commit Your Code Conference (CYC25)");
assertThat(conference.sessions()).isNotEmpty();
// Verify at least one session has speakers
boolean hasSessionWithSpeakers = conference.sessions().stream()
.anyMatch(session -> session.speakers() != null && session.speakers().length > 0);
assertThat(hasSessionWithSpeakers).isTrue();
}
}
What Makes Spring AI 1.1.0-M2 Special?
The latest milestone release brings several improvements that make MCP development much easier:
- No More Manual Registration: Previously, you had to manually register callbacks for each tool. Now, Spring's component scanning handles everything automatically.
- Simplified Annotations: The
@McpTool,@McpResource, and@McpPromptannotations are all you need. - Automatic Type Conversion: Spring AI handles JSON serialization and deserialization automatically, even for complex types.
- Built-in Transport Support: Both stdio and HTTP transports work out of the box with simple configuration.
- Spring Ecosystem Integration: Your MCP server is a full Spring Boot application, so you can use all the Spring features you know: dependency injection, configuration management, testing support, and more.
Tips and Best Practices
- Keep Tools Focused: Each tool should do one thing well. It's better to have many specific tools than few complex ones.
- Clear Names and Descriptions: AI relies on these to understand when to use each tool. Be clear and specific.
- Handle Errors Gracefully: Always include proper error handling in your tools. AI assistants can work around errors if they know what went wrong.
- Test with Real Queries: Use the MCP Inspector to test how AI assistants will actually interact with your tools.
- Version Your API: Include version information in your tool names if you need to maintain backward compatibility.
Conclusion
Building MCP servers with Spring AI has never been easier. With just a few annotations and the power of Spring Boot, you can expose your application's functionality to any AI assistant that supports MCP.
The beauty of this approach is its simplicity. You write normal Java methods, add an annotation, and suddenly your code is AI accessible. No complex protocols to learn, no manual wiring required.
Next Steps
- Explore the MCP Ecosystem: Check out existing MCP servers for inspiration at github.com/modelcontextprotocol
- Join the Community: The MCP community is growing rapidly. Join discussions and share your servers!
- Build Something Cool: Now that you know how easy it is, what will you build? A tool to manage your smart home? An assistant for your development workflow? The possibilities are endless.
- Share Your Creation: Built something interesting? Share it with the community and help others learn from your experience.
Resources
Happy coding, and welcome to the world of AI enabled Spring applications!
Dan Vega is a Spring Developer Advocate at Broadcom. You can find more of his content at danvega.dev. He'll be speaking about MCP and Spring AI at Commit your Code Conference 2025.
Related Articles
Creating Your First Model Context Protocol (MCP) Server in Java
Build powerful AI integrations by creating your own Model Context Protocol (MCP) server using Spring Boot and Spring AI. This comprehensive guide walks you through implementing a custom MCP server from scratch, enabling AI models like Claude to access your private data sources, execute specialized business logic, and interact with...
Embabel MCP Servers and Tools: Supercharging Your Agentic Flows on the JVM
Learn how to add tools and MCP servers to your Embabel agents in Java. Build a blog writing agent that can research topics, calculate reading time, and generate front matter.
Embabel First Look: Building Agentic Flows on the JVM
A first look at Embabel, a framework by Rod Johnson for building agentic AI flows on the JVM. Learn how to create a blog writing agent with goal-oriented action planning.