Spring Boot 4 introduces modular auto-configuration, which is why features like the H2 console might stop working after
you upgrade from Spring Boot 3. This breaking change splits the massive spring-boot-autoconfigure jar into smaller,
focused modules. If you've been scratching your head wondering why something that worked before suddenly doesn't, this
post will explain what changed and how to fix it.
Why Did Spring Boot Change Auto-Configuration?
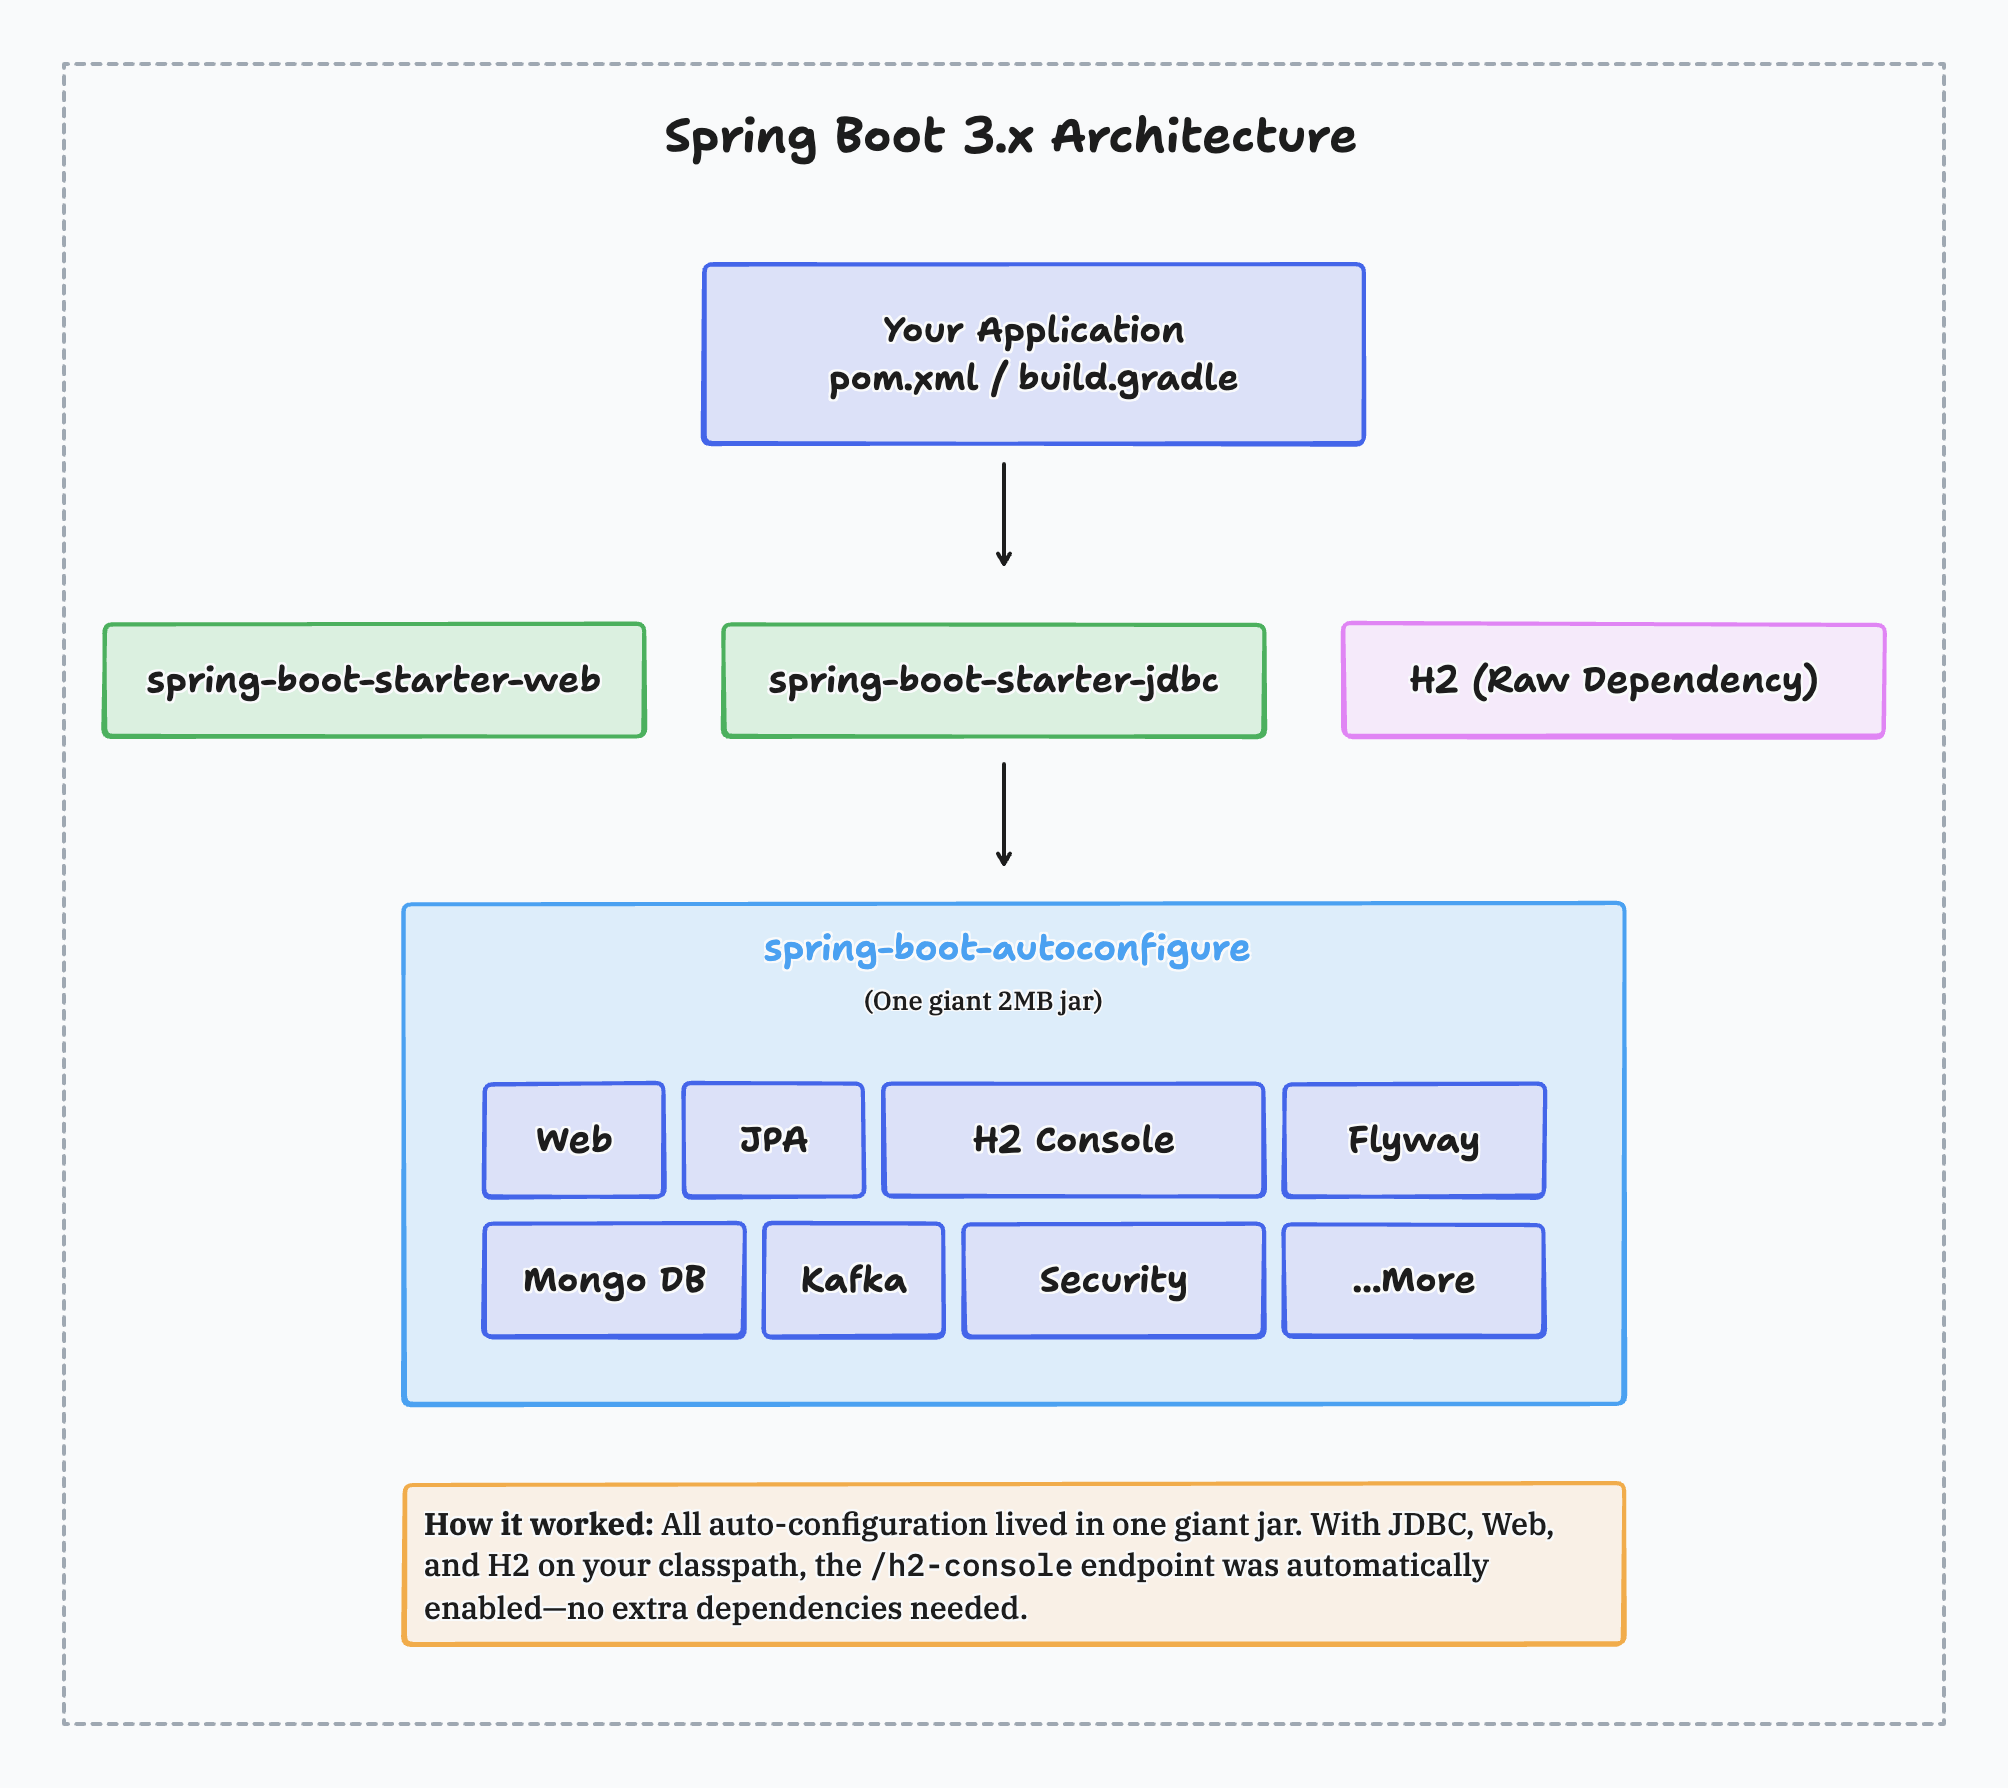
When Spring Boot 1.0 launched in 2014, the spring-boot-autoconfigure jar was a modest 182 KB. By Spring Boot 3.5,
it had grown to over 2 MB. That single jar contained auto-configuration code for every technology
Spring Boot supports: Kafka, MongoDB, Neo4j, LDAP, Flyway, and dozens more.
The problem? Your simple web app with a PostgreSQL database still carried configuration classes for technologies you weren't using. This created noise in your IDE's autocomplete, a larger classpath to scan, and confusion about which configuration properties actually applied to your application.
Spring Boot 4 fixes this by splitting that monolithic jar into smaller modules. Each technology now gets its own auto-configuration module. You only include what you need.
How Spring Boot 4 Modular Auto-Configuration Works
In Spring Boot 3.x, auto-configuration worked like this: if a library (like the H2 database driver) was on your classpath,
the corresponding configuration code in the giant spring-boot-autoconfigure jar would kick in automatically.
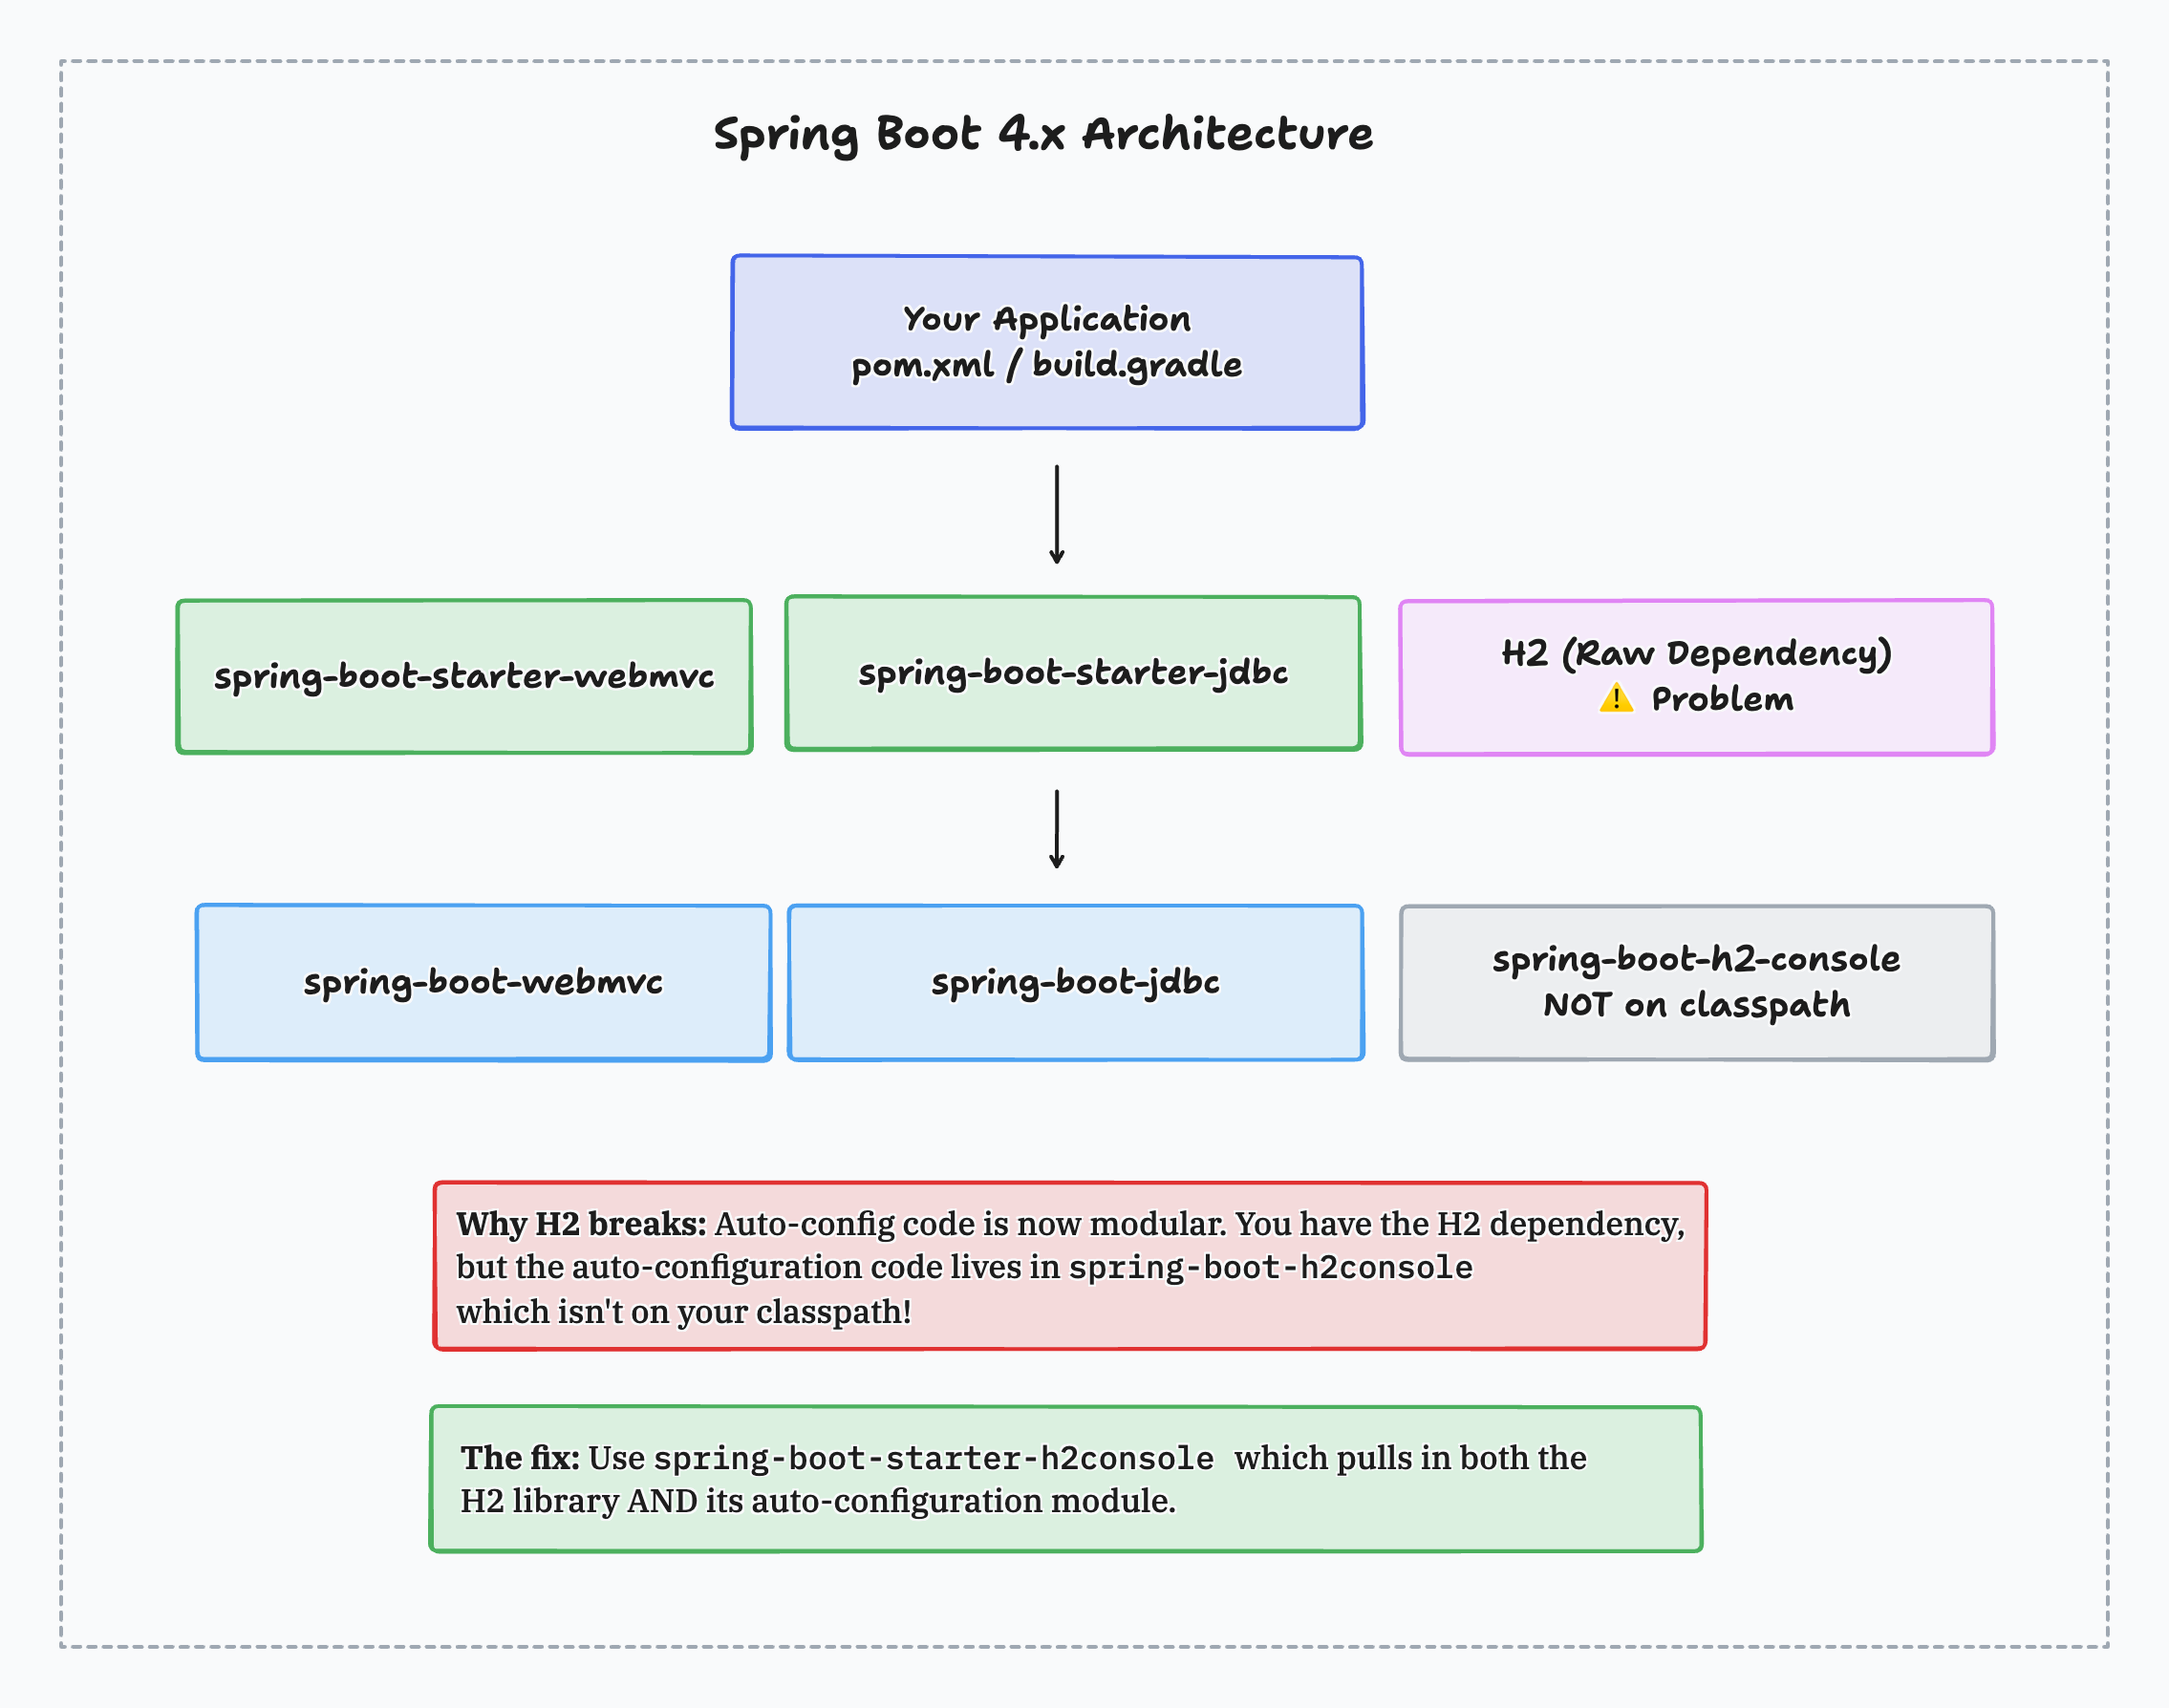
Spring Boot 4 changes this pattern. The auto-configuration code now lives in separate modules. Having the H2 driver on your classpath isn't enough anymore. You also need the module that contains the H2 console auto-configuration code.
This is why features break after upgrading. The library is still there, but the configuration code that wires it up has moved to a different module.
Why Your H2 Console Stopped Working After Upgrading
This is the most common question I've been getting since Spring Boot 4 released. Let's walk through exactly what happens.
Here's a typical Spring Boot 3.5 setup with the H2 database:
<parent>
<groupId>org.springframework.boot</groupId>
<artifactId>spring-boot-starter-parent</artifactId>
<version>3.5.0</version>
</parent>
<dependencies>
<dependency>
<groupId>org.springframework.boot</groupId>
<artifactId>spring-boot-starter-web</artifactId>
</dependency>
<dependency>
<groupId>org.springframework.boot</groupId>
<artifactId>spring-boot-starter-jdbc</artifactId>
</dependency>
<dependency>
<groupId>com.h2database</groupId>
<artifactId>h2</artifactId>
<scope>runtime</scope>
</dependency>
</dependencies>
With spring.h2.console.enabled=true in your configuration, the console appears at /h2-console. You'll see this in the logs:
H2 console available at '/h2-console'
Now upgrade to Spring Boot 4 and update the web starter name:
<parent>
<groupId>org.springframework.boot</groupId>
<artifactId>spring-boot-starter-parent</artifactId>
<version>4.0.0</version>
</parent>
<dependencies>
<dependency>
<groupId>org.springframework.boot</groupId>
<artifactId>spring-boot-starter-webmvc</artifactId>
</dependency>
<dependency>
<groupId>org.springframework.boot</groupId>
<artifactId>spring-boot-starter-jdbc</artifactId>
</dependency>
<dependency>
<groupId>com.h2database</groupId>
<artifactId>h2</artifactId>
<scope>runtime</scope>
</dependency>
</dependencies>
Run the application, and the H2 console message is gone from the logs. Navigate to /h2-console and you get a 404 error.
The H2 driver is still on your classpath. The configuration property is still set. But the auto-configuration code for
the H2 console now lives in a module called spring-boot-h2-console, and that module isn't in your dependency tree.
How to Fix Missing Auto-Configuration in Spring Boot 4
The fix is to use the appropriate starter instead of the raw dependency:
<dependencies>
<dependency>
<groupId>org.springframework.boot</groupId>
<artifactId>spring-boot-starter-webmvc</artifactId>
</dependency>
<dependency>
<groupId>org.springframework.boot</groupId>
<artifactId>spring-boot-starter-jdbc</artifactId>
</dependency>
<dependency>
<groupId>org.springframework.boot</groupId>
<artifactId>spring-boot-starter-h2-console</artifactId>
</dependency>
</dependencies>
The spring-boot-starter-h2-console pulls in both the H2 library and its auto-configuration module. Run your application and the console is back:
H2 console available at '/h2-console'
Spring Boot 4 Starter Changes You Need to Know
The H2 console is one example, but several other technologies now require explicit starters. Here's a reference table for your Spring Boot 4 migration:
| Technology | Spring Boot 3.x Approach | Spring Boot 4.x Starter |
|---|---|---|
| H2 Console | Raw h2 dependency | spring-boot-starter-h2-console |
| Flyway | Raw flyway-core dependency | spring-boot-starter-flyway |
| Liquibase | Raw liquibase-core dependency | spring-boot-starter-liquibase |
| REST Client | Part of web starter | spring-boot-starter-restclient |
| WebClient | Part of webflux starter | spring-boot-starter-webclient |
| Spring MVC | spring-boot-starter-web | spring-boot-starter-webmvc |
| WebFlux | spring-boot-starter-webflux | spring-boot-starter-webflux |
The web starter rename catches people too. If you're building a Spring MVC application, spring-boot-starter-web becomes spring-boot-starter-webmvc. This naming better reflects what's actually being configured.
Using spring-boot-autoconfigure-classic as an Escape Hatch
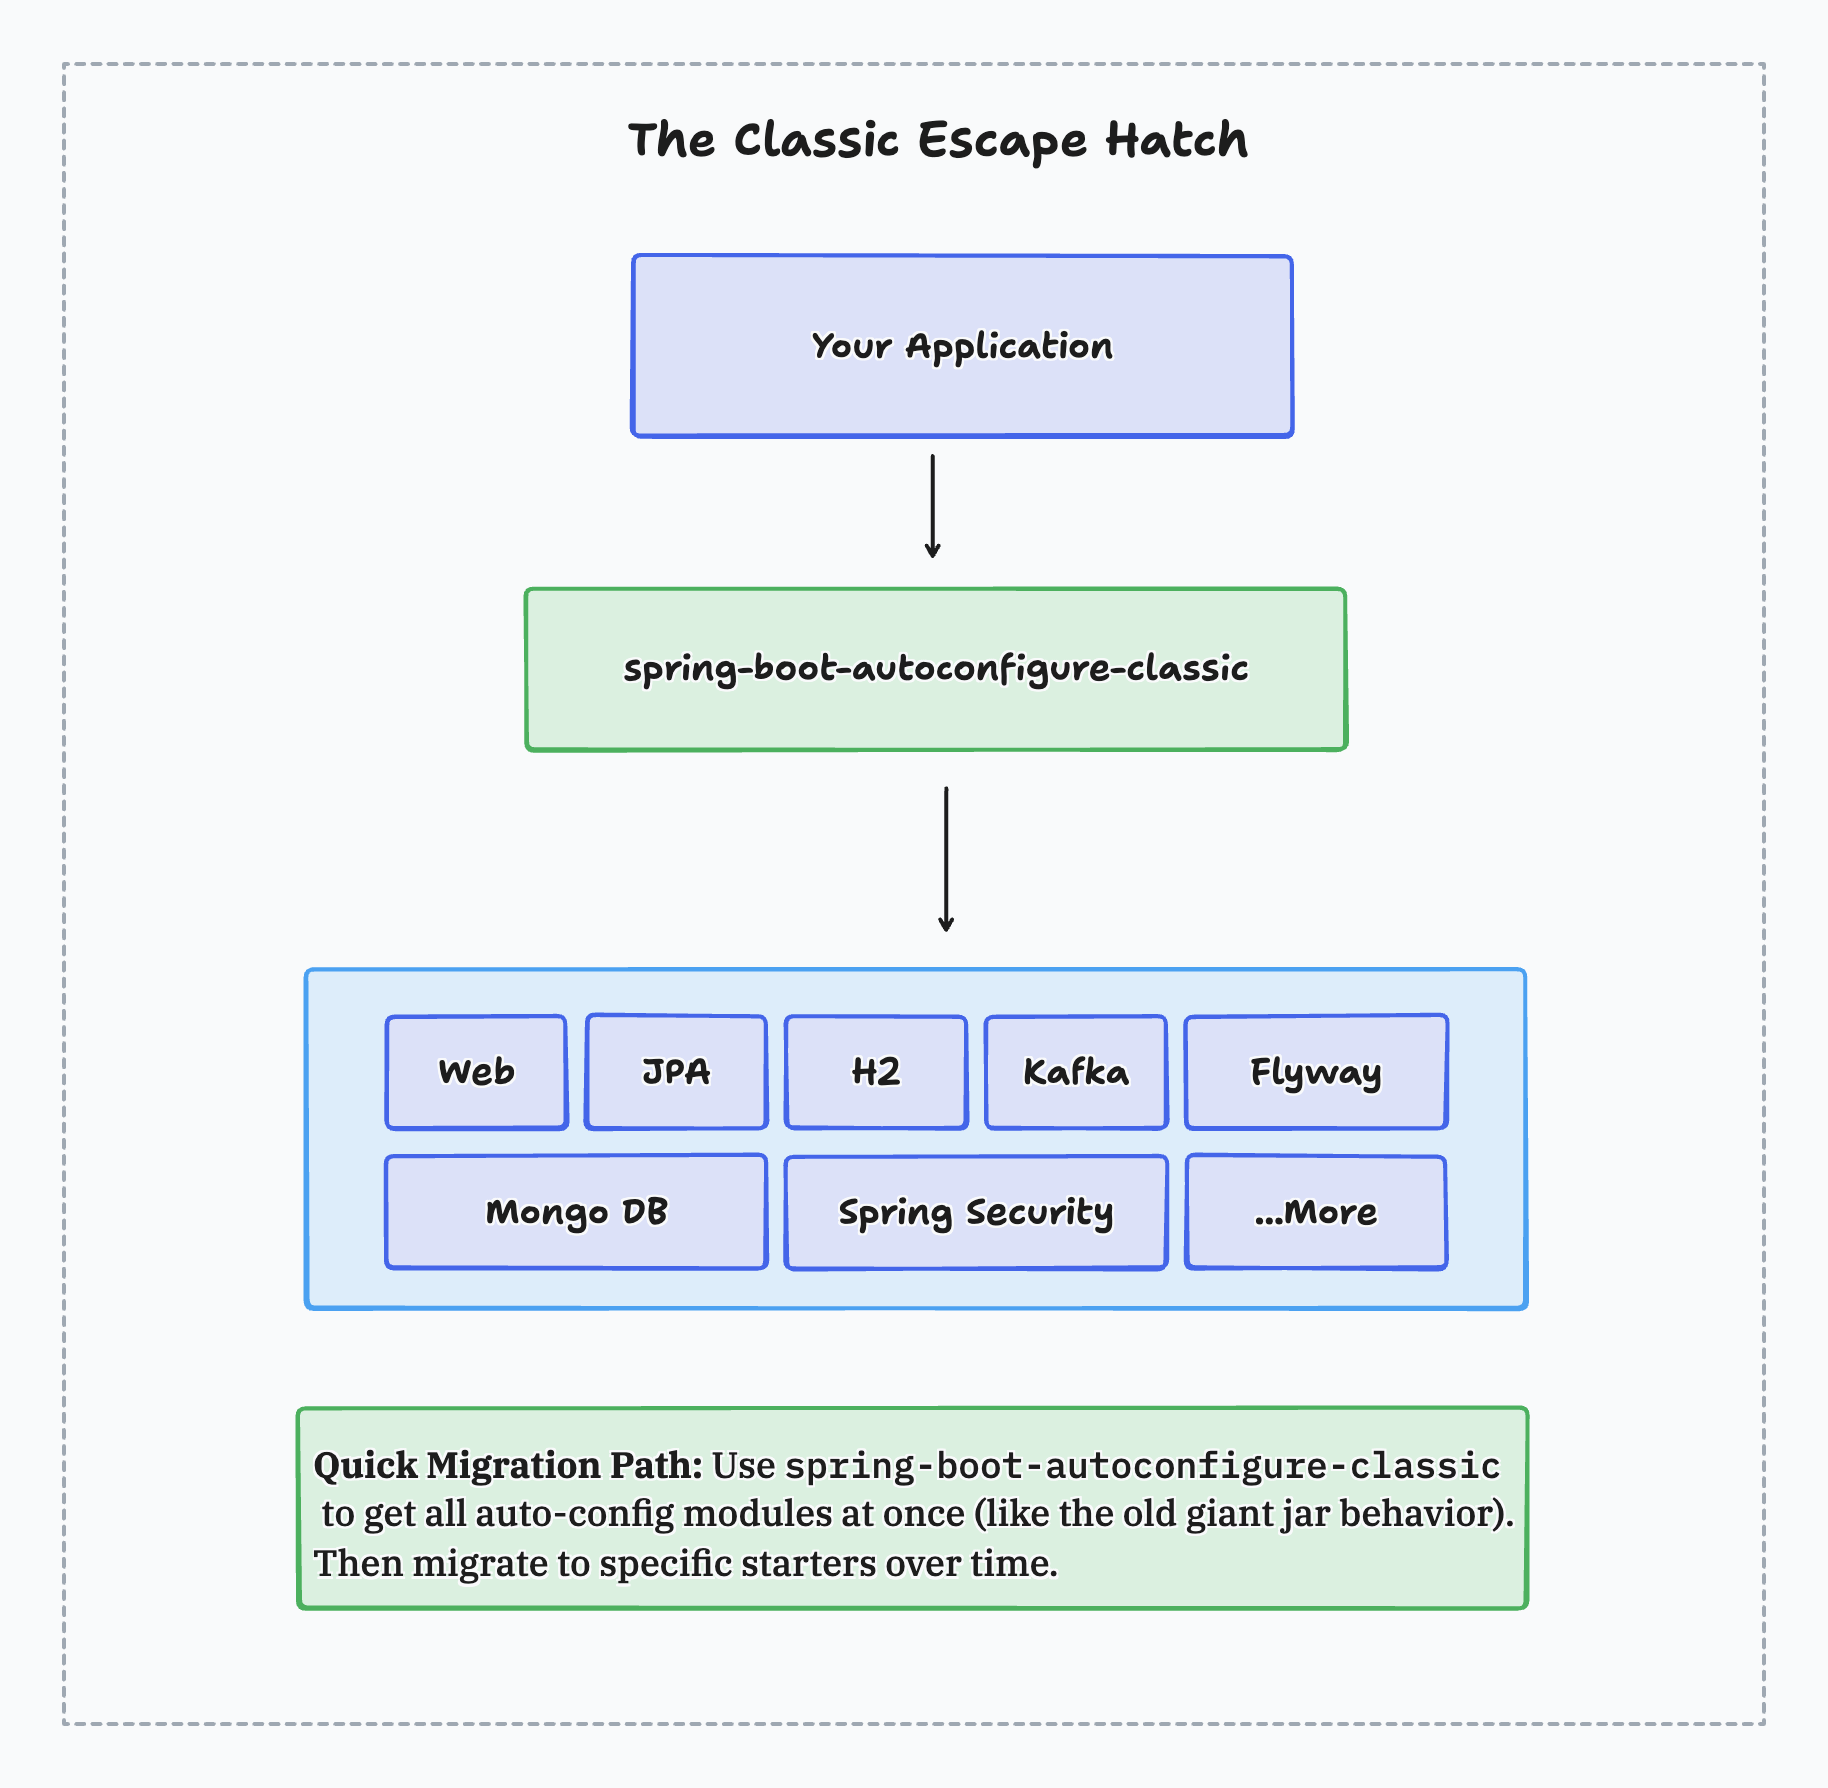
If you need to get your application running quickly without tracking down every missing module, Spring Boot 4 provides spring-boot-autoconfigure-classic:
<dependency>
<groupId>org.springframework.boot</groupId>
<artifactId>spring-boot-autoconfigure-classic</artifactId>
</dependency>
This dependency bundles all auto-configuration modules together, restoring Spring Boot 3.x behavior. Everything auto-configures based on classpath detection, just like before.
For tests, add the corresponding test classic starter:
<dependency>
<groupId>org.springframework.boot</groupId>
<artifactId>spring-boot-starter-test-classic</artifactId>
<scope>test</scope>
</dependency>
The classic starters are designed as a migration bridge. Use them to get running on Spring Boot 4, fix any other issues, then gradually migrate to targeted starters when your schedule allows.
Don't Forget the Test Starters
Spring Boot 4 also modularized the test infrastructure. For each main starter you use, add the corresponding test starter with test scope:
<dependency>
<groupId>org.springframework.boot</groupId>
<artifactId>spring-boot-starter-webmvc-test</artifactId>
<scope>test</scope>
</dependency>
<dependency>
<groupId>org.springframework.boot</groupId>
<artifactId>spring-boot-starter-jdbc-test</artifactId>
<scope>test</scope>
</dependency>
These test starters ensure annotations like @AutoConfigureMockMvc and @DataJdbcTest work correctly. Missing test starters can cause confusing test failures where the test context doesn't include the beans you expect.
Benefits of Modular Auto-Configuration
The migration overhead is real, but the modular architecture brings genuine benefits:
Cleaner IDE experience. Autocomplete suggestions now show only classes relevant to technologies you're using. Configuration property hints are focused on what you've actually configured.
Clearer intent. Spring Boot can understand why you added a dependency. Did you add WebFlux for a reactive server or to use WebClient as an HTTP client? With focused modules, the framework knows the answer and configures accordingly.
Faster startup. Less classpath scanning means quicker application startup, especially noticeable in larger applications.
Smaller dependency trees. Your application pulls in only the modules it needs. This matters for containerized deployments and native image compilation with GraalVM.
Spring Boot 4 Migration Checklist
When upgrading from Spring Boot 3.x to 4.x, work through these steps:
- Update to Spring Boot 3.5.x first. Resolve any deprecation warnings before jumping to 4.0. Deprecated code in 3.x is removed in 4.0.
- Update starter names. Replace
spring-boot-starter-webwithspring-boot-starter-webmvcfor Spring MVC applications. - Add technology-specific starters. If you relied on raw dependencies like
flyway-core,h2, orliquibase-corethat got auto-configured, switch to their corresponding starters. - Add test starters. For each main starter, add its test counterpart with test scope.
- Check the migration guide. The Spring Boot 4.0 Migration Guide has the complete list of starters and what they include.
- Use classic starters if needed. When debugging is taking too long, add
spring-boot-autoconfigure-classicto get running, then refine later.
Additional Resources
The Spring Boot team published detailed documentation about these changes:
- Modularizing Spring Boot - Official blog post explaining the motivation and migration path
- Spring Boot 4.0 Migration Guide - Complete migration documentation with all starters listed
- Spring Boot 4.0 Release Notes - Full release notes
The modular auto-configuration in Spring Boot 4 requires some adjustment during migration, but the cleaner dependency management and focused modules result in better applications. Once you understand why features break and how to fix them, the upgrade path becomes straightforward.
Happy Coding!
Related Articles
Native Retry Support in Spring Boot 4: No External Dependencies Required
Spring Boot 4 includes native retry support with @Retryable, RetryTemplate, and @ConcurrencyLimit. Learn how to add resilience without the spring-retry dependency.
Stop NullPointerExceptions Before Production with Spring Boot 4's Null Safety
Discover how Spring Boot 4 and JSpecify annotations catch NullPointerExceptions at compile-time instead of runtime. Learn to implement @NullMarked and @Nullable for bulletproof Java code with practical examples.
GraphQL for Java Developers
Learn how to build scalable GraphQL APIs with Java 26 and Spring Boot 4. This course walks you through schema-first development, batch loading, unions, Query by Example, AOT repositories, and more.